Fusion Middleware Part I
Fusion Middleware Part I
--In order to install SOA suite version 10.1.3.X you need Database version 10.2.X or higher to hold schema for BPEL, ESB, WSM ....
--This database can exist on same machine (but under different ORACLE_HOME) or can be on different machine where you are planning to install SOA.
--For this installation demo, I installing Database release 10.2.0.1 on same machine under ORACLE_HOME.
--This demo installation is on Redhat Linux ES 3 which is on VMWare.
Install Oracle Database 10.2.0.1
-------------------------------------------
Software for Oracle Database can be downloaded from this link
Operating System Prereq.
For linux following version are supported for database version 10.2.0.1 at time of writing this doc
-Redhat-3
-Redhat-4
-SuSe-9
-Aslinux-1
-Aslinux-2
I picked up Red hat ES -3 (Enterprise Server) as operating system.
Packages and Kernel Parameters mentioned below are for database 10.2.0.1 on Red Hat linux Version 3 (Check Installation Documentation if your operating system version differs)
Packages
Following packages with atleast following version should be installed
binutils-2.14
gcc-3.2
libaio-0.3.96
glic-2.3.2-95.47
To check if package/rpm is installed
rpm –qa grep {rpm_name} (From root)
To install package/rpm
rpm –ivh {rpm_name} (From root)
Kernel Parameter
Make sure you add following entry in /etc/sysctl.conf

After adding these entries execute below command to take these parameters in to effect
sysctl –p /etc/sysctl.conf
Unzip software you downloaded above as
unzip 10201_database_linux32.zip
Starting Database Installation
sysctl –p /etc/sysctl.conf
Unzip software you downloaded above as
unzip 10201_database_linux32.zip
Starting Database Installation
---------------------------------------------
Start Oracle Universal Installer (OUI) by running
./runInstaller (from location where you unzipped database) *Use operating system user like oracle or orainstall (don’t execute runInstaller from root user)
Start Oracle Universal Installer (OUI) by running
./runInstaller (from location where you unzipped database) *Use operating system user like oracle or orainstall (don’t execute runInstaller from root user)
 With this screen you get option to do basic database installation where as I opted for Advanced Installation (With Advanced Installation Option you get flexibility on where to keep database and various other options). You can also choose Basic Installation and OUI will ask only basic question and for rest values it will take default (pre configured) values.
Again you have three options for type of installation for your database (Choose one as per your requirement, if you are not sure which one to pick, leave default i.e. Enterprise Edition)
 This is important detail which is prompting for Database ORACLE_HOME Name and Destination Path.
ORACLE_HOME is always unique per system which identifies oracle software installed (Oracle Software can be database, application server or various other oracle software)
PATH is directory where your oracle database software will be installed (Please note Oracle Software is not same as Oracle Data files)

In my case Oracle Database 10.2.X requires minimum 900 MB memory but just had 750 MB allocated to Virtual Machine on which I am installing this database so I got warning related to memory. If you get warning related to memory you can ignore it (Not for Production or UAT deployment)

In above screen you have option to Create Database, Configure ASM (more coming on ASM with RAC soon ...) or Install database software only.
If you select database software only you can create database later as well (this option will only install oracle database software and will not create any database)
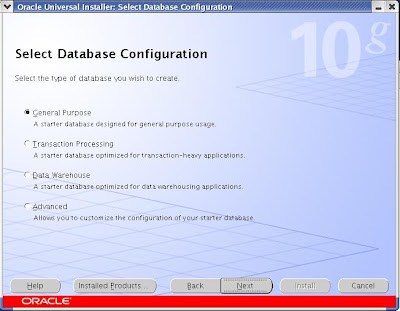
Leave default General Purpose in above screen
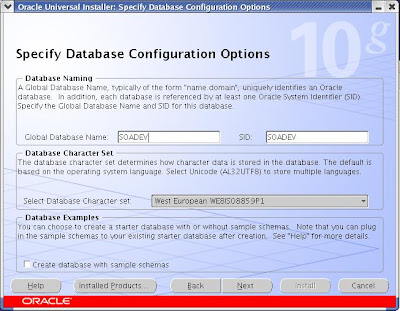
If you have selected “Create a Database” above on this screen you have option to define SID and Global Database name for database which we are going to create with install. (You can leave default “orcl” SID or change like “SOADEV” to uniquely identify this database that it is going to be used with SOA Suite)
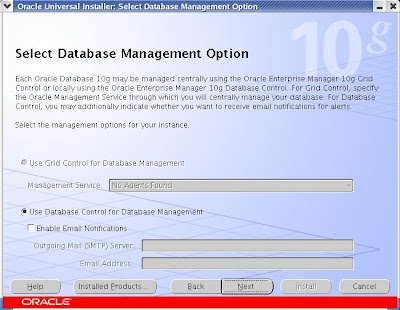
Leave default “Database Control Management” or choose option 1 if you have Grid Control Agents installed on machine on which you are trying to install this database.
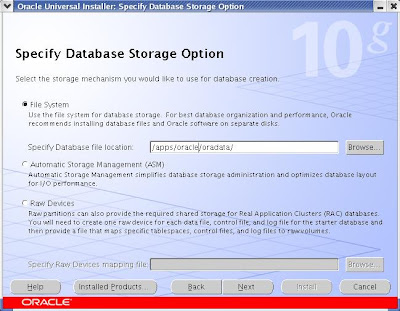
Here you can specify type of storage management for database (SOADEV) which you are going to install. This storage management as seen in image can be File System, ASM or Raw device.
Specify Database file location if you choose File System as storage management. (Database file location can exist under ORACLE_HOME or any other location. * better keep this different from ORACLE_HOME for better management)


Choose password for your various schema (For security reasons, don’t choose same password for all accounts on production instance)

Click on “Install” button to start your installation (Installation may take 30 minutes to 3 hours depending on your machine)


If you wish to unlock non system accounts click on “Password Management” or click “OK” for unlocking them later. (For SOA Suite Installation, you can leave them locked)

execute command root.sh from root user as shown blow


This will complete your database installation for SOA Suite Installation.
If you wish to start/stop oracle database installed above
Set PATH, ORACLE_HOME, ORACLE_SID like
export ORACLE_HOME = /home/oracle/product/10.2.0/db
export ORACLE_SID = SOADEV
export PATH = $PATH:$ORACLE_HOME/bin
(Where ORACLE_HOME and ORACLE_SID we entered above while installing database)
Stopping database services
---------------------------------------
sqlplus “/as sysdba”
SQL> shutdown immediate
lsnrctl stop
Starting database services
---------------------------------------
lsnrctl start
sqlplus “/as sysdba”
SQL> start
For SOA Suite installation stay tuned (coming soon...)
You can also subscribe to email feeds on right menu of this page for updates on this Apps DBA blog.
No comments:
Post a Comment