Showing posts with label Common DBA Topics. Show all posts

Tuesday, April 28, 2009

Upgarde DB to 10.2.0.2

Next step in installing SOA Suite after installing 10.2.0.1 database is to upgrade this oracle database to version 10.2.0.2 (4547817).

For Oracle Database 10.2.0.1 Installation Step and Software location click here

If you selected Standard Edition during 10.2.0.1 database installation, you can skip this database upgrade step. This is because for Enetrprise Edition Database, SOA Suite is certified only with 9.2.0.7 and higher (in 9i database) or version 10.2.0.2. ( For Standard Edition database 10.2.0.1 is certified with SOA Suite 10.3.0.1).

For detailed information on how to upgrade from 10.2.0.1 database to version 10.2.0.2 follow readme of patch 4547817 or metalink note 316900.1

Few things about 10.2.0.2 patch set
i) 10.2.0.2 patch set is not complete software, You can only apply it on top of existing 10.2.0.X installation.
ii) This patchset on linux can be applied on following version of linux Suse 9, Red Hat AS/ES 3, 4

Pre Installation Steps
-------------------------------
i) Download patch p4547817_10202_LINUX.zip (download patch according to your operating system like windows, solaris..) and copy it to your linux machine

ii) Unzip patch as “unzip p4547817_10202_LINUX.zip”

iii) Set ORACLE_HOME and ORACLE_SID to your database (10.2.0.X) on which you are planning to apply this patchset . In my case its
ORACLE_HOME = /home/oracle/product/10.2.0/db
ORACLE_SID = SOADEV

export ORACLE_HOME ORACLE_SID
(Command to export environment variable differ as per your shell, above command is used for bash, bourne or ksh)

iv) Stop database and database listener as mentioned at end of database installation in my previous post

v) Backup your system (In case anything goes wrong)

Database 10.2.0.2 Patch Set Installation
------------------------------------------------
i) Login as user who installed 10.2.0.X database (In my case its “oracle” )

ii) cd patchset_unzip_directory/DISK1

iii) ./runInstaller

iv) On welcome screen click Next

v) On Specify file location screen, in Name field and Path select Database on which you wish to apply this patch (If you have multiple database installed on your machine you will see drop down menu to select database oracle_home)


vi) On summay screen, click Install


vii) In the end when prompted to run root.sh , login as root from another window and execute root.sh in ORACLE_HOME

viii) In the end of installation screen click Exit, and click Yes to exit from Oracle Universal Installer

This step will complete database software upgraded to patchset 10.2.0.2 but we haven’t upgraded our database yet to 10.2.0.2 (In next step we will upgrade our database to 10.2.0.2 version).


Upgrade 10.2.0.X database to 10.2.0.2
----------------------------------------------------
Please note steps mentioned here are for upgrading database to 10.2.0.2 from 10.2.0.X version, for upgrade from previous release (8i, 9i, 10g) refer metalink note mentioned above

i) Make sure you have applied patchset 10.2.0.2 on oracle_home (on which database is installed)

ii) Login as database owner (oracle) and exexute sqlplus “/as sysdba”

iii) SQL> startup upgrade
iv) SQL> spool 10202upgrade.log
v) SQL> @/rdbms/admin/catupgrd.sql
vi) SQL> spool off

(Check if there are any error message in 10202upgarde.log and rerun catupgrd.sql after fixing errors)

In the end of log file (10202upgarde.log) you should see output like below with component version as 10.2.0.2.0


vii) SQL> shutdown
viii) SQL> startup
ix) SQL> @?/rdbms/admin/utlrp.sql
x) SQL> select count(*) from dba_objects where status like ‘INVALID’;
Count (*)
0
xi) SQL> shutdown immediate (After upgrade and invalid object compilation restart your database cleanly)
xii) lsnrctl start
xiii) SQL> startup

This completes your oracle database upgrade to 10.2.0.2 version.


Loading ORABPEL, ORAESB and ORAWSM schema in above database and SOA Suite installation coming next...
Install Database 10.2.0.1

In next few posts I’ll cover installation of SOA Suite (Service Oriented Architecture Suite) which is one of the components in Oracle Fusion Middleware. For more information on Oracle Fusion Middleware and its various components and overview visit

Fusion Middleware Part I

--In order to install SOA suite version 10.1.3.X you need Database version 10.2.X or higher to hold schema for BPEL, ESB, WSM ....
--This database can exist on same machine (but under different ORACLE_HOME) or can be on different machine where you are planning to install SOA.
--For this installation demo, I installing Database release 10.2.0.1 on same machine under ORACLE_HOME.
--This demo installation is on Redhat Linux ES 3 which is on VMWare.

Install Oracle Database 10.2.0.1
-------------------------------------------
Software for Oracle Database can be downloaded from this link

Operating System Prereq.
For linux following version are supported for database version 10.2.0.1 at time of writing this doc
-Redhat-3
-Redhat-4
-SuSe-9
-Aslinux-1
-Aslinux-2

I picked up Red hat ES -3 (Enterprise Server) as operating system.

Packages and Kernel Parameters mentioned below are for database 10.2.0.1 on Red Hat linux Version 3 (Check Installation Documentation if your operating system version differs)

Packages
Following packages with atleast following version should be installed
binutils-2.14
gcc-3.2
libaio-0.3.96
glic-2.3.2-95.47

To check if package/rpm is installed
rpm –qa grep {rpm_name} (From root)

To install package/rpm
rpm –ivh {rpm_name} (From root)


Kernel Parameter
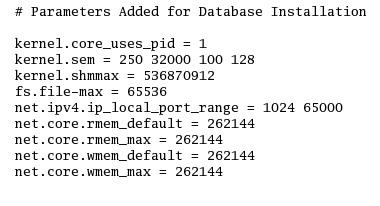
Make sure you add following entry in /etc/sysctl.conf


After adding these entries execute below command to take these parameters in to effect

sysctl –p /etc/sysctl.conf

Unzip software you downloaded above as

unzip 10201_database_linux32.zip

Starting Database Installation
---------------------------------------------
Start Oracle Universal Installer (OUI) by running

./runInstaller (from location where you unzipped database) *Use operating system user like oracle or orainstall (don’t execute runInstaller from root user)


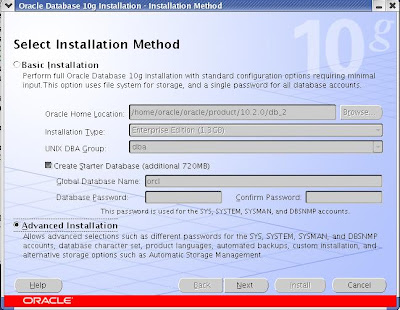
With this screen you get option to do basic database installation where as I opted for Advanced Installation (With Advanced Installation Option you get flexibility on where to keep database and various other options). You can also choose Basic Installation and OUI will ask only basic question and for rest values it will take default (pre configured) values.


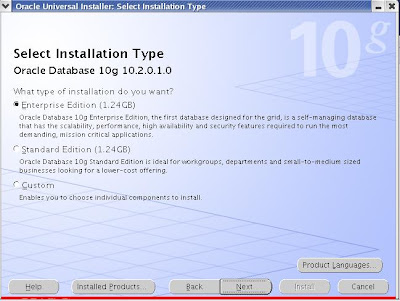
Again you have three options for type of installation for your database (Choose one as per your requirement, if you are not sure which one to pick, leave default i.e. Enterprise Edition)


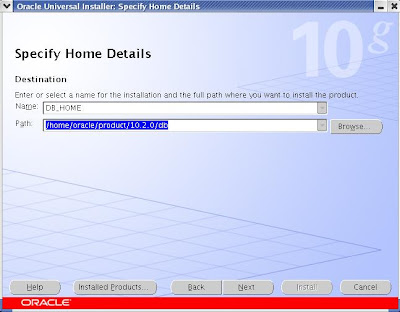
This is important detail which is prompting for Database ORACLE_HOME Name and Destination Path.

ORACLE_HOME is always unique per system which identifies oracle software installed (Oracle Software can be database, application server or various other oracle software)
PATH is directory where your oracle database software will be installed (Please note Oracle Software is not same as Oracle Data files)


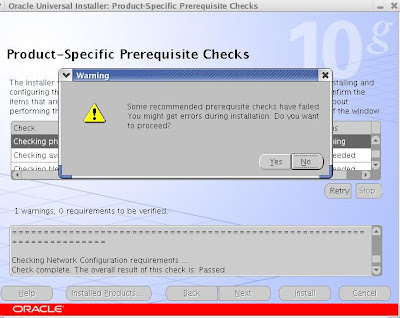
In my case Oracle Database 10.2.X requires minimum 900 MB memory but just had 750 MB allocated to Virtual Machine on which I am installing this database so I got warning related to memory. If you get warning related to memory you can ignore it (Not for Production or UAT deployment)


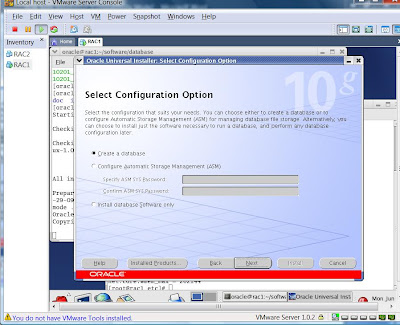
In above screen you have option to Create Database, Configure ASM (more coming on ASM with RAC soon ...) or Install database software only.

If you select database software only you can create database later as well (this option will only install oracle database software and will not create any database)


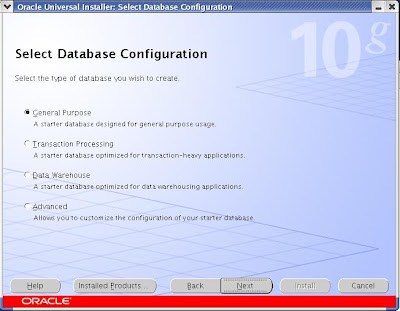
Leave default General Purpose in above screen


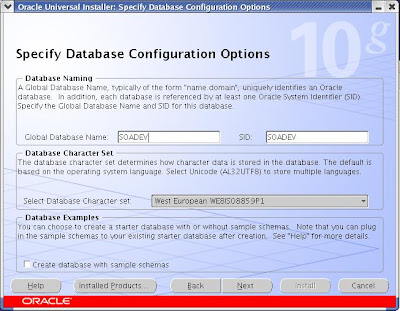
If you have selected “Create a Database” above on this screen you have option to define SID and Global Database name for database which we are going to create with install. (You can leave default “orcl” SID or change like “SOADEV” to uniquely identify this database that it is going to be used with SOA Suite)


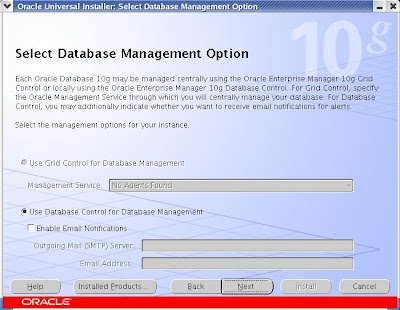
Leave default “Database Control Management” or choose option 1 if you have Grid Control Agents installed on machine on which you are trying to install this database.


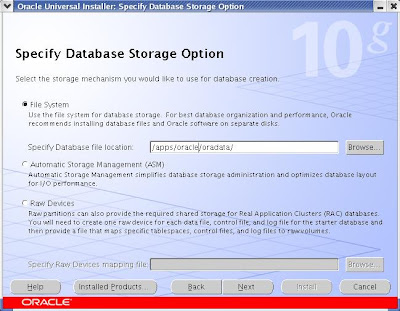
Here you can specify type of storage management for database (SOADEV) which you are going to install. This storage management as seen in image can be File System, ASM or Raw device.

Specify Database file location if you choose File System as storage management. (Database file location can exist under ORACLE_HOME or any other location. * better keep this different from ORACLE_HOME for better management)


Choose password for your various schema (For security reasons, don’t choose same password for all accounts on production instance)


Click on “Install” button to start your installation (Installation may take 30 minutes to 3 hours depending on your machine)


If you wish to unlock non system accounts click on “Password Management” or click “OK” for unlocking them later. (For SOA Suite Installation, you can leave them locked)


execute command root.sh from root user as shown blow


This will complete your database installation for SOA Suite Installation.


If you wish to start/stop oracle database installed above


Set PATH, ORACLE_HOME, ORACLE_SID like
export ORACLE_HOME = /home/oracle/product/10.2.0/db
export ORACLE_SID = SOADEV
export PATH = $PATH:$ORACLE_HOME/bin

(Where ORACLE_HOME and ORACLE_SID we entered above while installing database)

Stopping database services
---------------------------------------
sqlplus “/as sysdba”
SQL> shutdown immediate
lsnrctl stop

Starting database services
---------------------------------------
lsnrctl start
sqlplus “/as sysdba”
SQL> start


For SOA Suite installation stay tuned (coming soon...)

You can also subscribe to email feeds on right menu of this page for updates on this Apps DBA blog.

Labels: ,

oraInventory Basics

You all might be familiar with oraInventory & its importance so lets take a look at few common things about it like binary/xml inventory, What to do if Inventory is corrupted , What is global / Local Inventory and where to find documentation related to oraInventory .

What is oraInventory ?
oraInventory is repository (directory) which store/records oracle software products & their oracle_homes location on a machine. This Inventory now a days in XML format and called as XML Inventory where as in past it used to be in binary format & called as binary Inventory.
There are basically two kind of Inventory Global Inventory (also called as Central Inventory) and Local Inventory also called as Oracle Home Inventory.

Global Inventory ?
Global Inventory holds information about Oracle Products on a Machine. These products can be various oracle components like database, oracle application server, collaboration suite, soa suite, forms & reports or discoverer server . This global Inventory location will be determined by file oraInst.loc in /etc (on Linux) or /var/opt/oracle (solaris). If you want to see list of oracle products on machine check for file inventory.xml under ContentsXML in oraInventory (Please note if you have multiple global Inventory on machine check all oraInventory directories)

You will see entry like
HOME NAME="ORA10g_HOME" LOC="/u01/oracle/10.2.0/db" TYPE="O" IDX="1"/
...
...

Local Inventory
Inventory inside each Oracle Home is called as local Inventory or oracle_home Inventory. This Inventory holds information to that oracle_home only.

Can I have multiple Global Inventory on a machine ?
Quite common questions is that can you have multiple global Inventory and answer is YES you can have multiple global Inventory but if your upgrading or applying patch then change Inventory Pointer oraInst.loc to respective location. If you are following single global Inventory and if you wish to uninstall any software then remove it from Global Inventory as well.

What to do if my Global Inventory is corrupted ?
No need to worry if your global Inventory is corrupted, you can recreate global Inventory on machine using Universal Installer and attach already Installed oracle home by option
-attachHome

./runInstaller -silent -attachHome -invPtrLoc $location_to_oraInst.loc
ORACLE_HOME="Oracle_Home_Location" ORACLE_HOME_NAME="Oracle_Home_Name"
CLUSTER_NODES="{}"

Do I need to worry about oraInventory during oracle Apps 11i cloning ?
No, Rapid Clone will update both Global & Local Inventory with required information , you don't have to worry about Inventory during Oracle Apps 11i cloning.

Those of you who have registered email notification and not receiving any mails, drop me a mail at v.sundeepreddy@gmail.com

Your comments are quite important to me so leave comments about posts , suggestions, criticism, topics you want to hear or any thing about this post ....

Labels:

Install Oracle RAC Database part IV

This is fourth and last post for installing Oracle RAC Database on single machine using VMWare virtual machines. For previous posts visit

Are you scared of Oracle RAC Database
Install Oracle RAC Database I
Install Oracle RAC Database Part II
Install Oracle RAC Database Part III

In this part we will install oracle clusterware and rac database

Copy Oracle RAC and Oracle Database Software to RAC1

Create a directory software in $HOME and copy clusterware and database zip files downloaded

unzip 10201_clusterware_linux32.zip
unzip 10201_database_linux32.zip

This will create directory clusterware (for clusterware software) and database (for database software)

Verify all prereq. for clusterware installation
------------------------------------------------------------

cd /home/oracle/softwar/clusterware/cluvfy

Make sure
--Second Machine/Node RAC2 is up
-- You have configured and changes hostname and network IP of RAC2
-- RAC1 can ping RAC2 and vice versa
-- User equivalency is set for user oracle on RAC1 and RAC2
-- You can connect to rac2 from rac1 as user oracle without prompting password and vice versa

./runcluvfy.sh stage –pre crsinst –n rac1,rac2

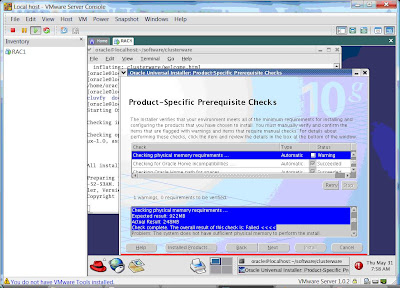
Make sure Node reachable and User Equivalency is met, rest other checks (related memory) can be ignored

Once RAC1 and RAC2 can ping each other and oracle user can connect to other machine's oracle user without prompting password then start clusterware installation from user oracle.


Change directory to location where you have unzipped clusterware software and start clusterware installation by running runInstaller

./runInstaller


Ignore memory related prereq.


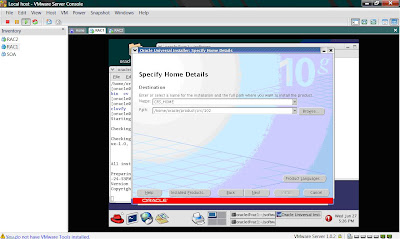
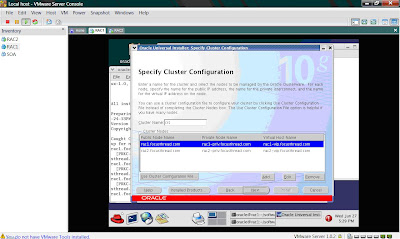
Add second node rac2 by clicking on Add link


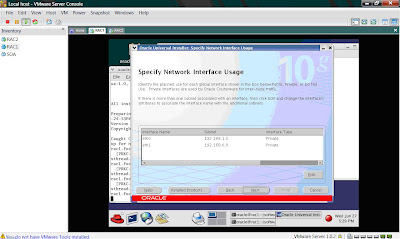
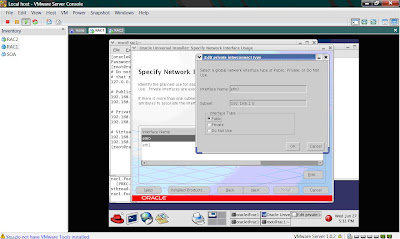
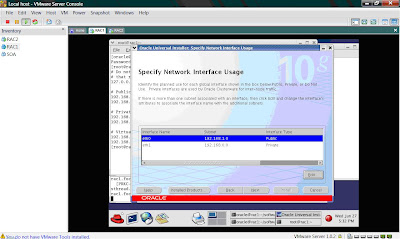
Change subnet as per your network configuration as you did while configuring network card.


Make one public and another private (Private interconnect for clusterware)


Specify ocr location like /apps/oracle/oradata/ocr (or as per your naming convention)


Specify voting disk location like /apps/oracle/oradata/votingdisk (or as per your naming convention)


Click on Install to install clusterware.
After clusterware installation, Install Database

Install RAC Database
Go to location where you unzipped database disks
./runInstallerignoreSysPrereqs (this is required as our memory is less (below 900MB) required, if your machine spec is higher you can ignore using ignoreSysPrereqs)


Specify database oracle_home (make this different from clusterware oracle_home installed in previous step)


Enter database name of your choice


Select ASM


Ignore any warnings and click on OK


Define location of ASM as /dev/raw/raw3 and make redundancy as external


Click on Install
Why number of voting disks should always be odd number only ?
How to troubleshoot RAC database and clusterware issue ?
.. Coming in future posts

Labels: ,

Step by Step install RAC using VMWare part III

his is fourth post on step by step building Oracle RAC Database on your desktop / laptop using VMWare (Virtual Machine)

For previous three posts visit

Try installing Orcale RAC on your laptop
RAC Part I - Install Virtual Machine and Linux
RAC Part II - Install Virtual Disk and Network Card

In this post you will

--Clone RAC1 to RAC2 and change IP address of RAc2
--Configure User equivalency for Orale Clusterware installation


Clone RAC1 to RAC2
-------------------------------

- Make sure virtual linux machine is shutdown
-Copy folder rac1 to folder rac2 in c:\Atul\VMWARE (This is on windows laptop/machine)


--In both RAC1 and RAC2 folder open “Red Hat Enterprise Linux 3.vmx” (This is virtual machine configuration file) using notepad or wordpad

--Add following lines (This will avoid locking for shared files and two linux machines RAC1 and RAC2 can start together using shared files votingdisk, crs and asm)


disk.locking = "FALSE"
diskLib.dataCacheMaxSize = "0"
diskLib.dataCacheMaxReadAheadSize = "0"
diskLib.dataCacheMinReadAheadSize = "0"
diskLib.dataCachePageSize = "4096"
diskLib.maxUnsyncedWrites = "0"


--Now on vmx file of RAC2 “Red Hat Enterprise Linux 3.vmx” change following lines from displayName = "RAC1" to displayName = "RAC2"

--On VMWare Server Console, Click on File and Open or “Ctrl + O”


--Click on Browse and select “red hat enterprise linux 3.vmx” from RAC2 directory

--Now you should see two linux machines RAC1 and RAC2 on VMWare Console


Start RAC1 and RAC2 and when you get below warning on RAC2, select create and click OK


Make sure you can start both machine at same time, if you get message like unable to lock files, check you have added following lines in both machines vmx files mentioned above (regarding disk locking)


Change Network Settings (IP) on RAC2
-------------------------------------------------

Login as ROOT user in RAC2 machine and click System Setting -> Network


Select eth0 and click on Edit


Change Address from 192.168.1.101 to 192.168.1.102


Click on Hardware Device Tab and Click on Probe button


--Repeat steps for second network card eth1 and change its IP from 192.168.0.101 to 192.168.0.102

Make sure you clicked probe on eth1 as well as shown above


Activate both network cards by clicking on Activate as shown below


If you get error message that eth0 has different MAC address expected as shown below; make sure you have clicked on probe on “Bind to Mac Address” on “Hardware Device” mentioned above.


Make sure both network cards are active now, as shown below


Add following entry in /etc/hosts file of both RAC1 and RAC2

####


127.0.0.1 loalhost.localdomain localhost
192.168.1.102 rac2.focusthread.com rac2 rac2-vip.focusthread.com rac2-vip
192.168.0.102 rac2-priv.focusthread.com rac2-priv
192.168.1.101 rac1.focusthread.com rac1 rac1-vip.focusthread.com rac1-vip
192.168.0.101 rac1-priv.focusthread.com rac1-priv

###


Now trying to ping RAC2 machine from RAC1 and RAC1 machine from RAC2


Change Host Name of newly cloned RAC2

-------------------------------------------------


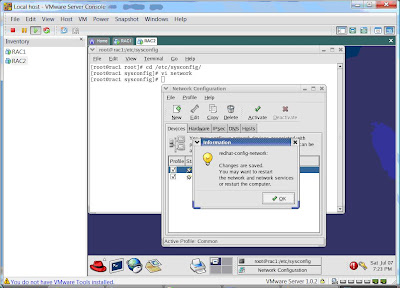
Follow below step on how to change hostname on RAC2 (newly cloned) Linux machine
Open file /etc/sysconfig/network and edit line like : HOSTNAME=XXXXX i.e. from
HOSTNAME rac1.focusthread.com To HOSTNAME rac2.focusthread.com


Configure User Equivalency

-----------------------------------

User equivalency for user oracle is required so that user oracle from RAC1 can communicate to user oracle on RAC2 machine without prompting for password for clusterware to work properly.


--Login as user oracle in machine RAC1
--Make sure sshd daemon is running (pgrep sshd), If not start it from root user like “service start sshd
--Create RSA and DSA key on each node
-From oracle user go to user home directory by “cd $HOME” or type cd and press enter
-mkdir .ssh (note that there is dot before ssh which means this is hidden directory)
-chmod 700 .ssh
-ssh-keygen –t rsa
-ssh-keygen –t dsa
press enter when prompted for file to save the key and passphrase (check screenshot for more information)


Repeat this on both the nodes i.e. RAC1 and RAC2


Add keys to authorized key file (authorized_keys)
------------------------------------------------------------
-cd .ssh
-touch authorized_keys
-ls (You should see authorized_keys, id_dsa, id_dsa.pub, id_rsa, id_rsa.pub. Here pub files are dsa and rsa public key file and id_dsa and id_rsa are private key files)
ssh rac1 cat /home/oracle/.ssh/id_rsa.pub >> authorized_keys
ssh rac1 cat /home/oracle/.ssh/id_dsa.pub >> authorized_keys
ssh rac2 cat /home/oracle/.ssh/id_rsa.pub >> authorized_keys
ssh rac2 cat /home/oracle/.ssh/id_dsa.pub >> authorized_keys
Send authorized_keys from RAC1 to RAC2
scp authorized_keys rac2:/home/oracle/.ssh


From RAC1 machine as user oracle
exec /usr/bin/ssh-agent $SHELL
/usr/bin/ssh-add


Test User Equivalency (User oracle can login to other machine without password prompt)
----------------------------
ssh rac1 date
ssh rac2 date

Test this from both nodes RAC1 and RAC2 (You should not be prompted for oracle user password)

For more information on User Equivalency visit chapter 2 (Page 51 to 53) of clusterware and rac installation guide


Coming Next :
Installing clusterware on RAC1 and RAC2
Installing RAC database on RAC1 and RAC2 linux machines using ASM

Labels: ,