I hope you have gone through Oracle apps 11i Architecture , installation & File system. If you are reading this post without reading Part I which is at http://reddba.blogspot.com/.html then please first go through it first then only you can appreciate this post.
By Now You know Apps Architecture , Installation 11i Apps & you had a glance Filesystem of Oracle Apps Vision Instance (If you don't understand all directories in file system don't worry, It took 2 years for me to understand various directories in Apps 11i)
Next you should try is Start Stop Oracle application 11i Services .
Order of Startup is
First Database Services & then Application Tier Services (Middle Tier)
Order of Shutdown is
First Application Tier Services & then Database.
In order to check How to Start Stop Oracle apps 11i Middle Tier services & where are shutdown / startup script exist check http://reddba.blogspot.com/2009/04/startup-shutdown-apps-services.html
Database & DB Listener startup / shutdown scripts are under $ORACLE_HOME/appsutil/scripts/$CONTEXT_NAME or $ORACLE_HOME/appsutil/scripts/$SID ( depending on your Apps 11i & AD version )
addbctl.sh is used to control database . Start/Stop database
addlnctl.sh is used to control database listener ( Note that database listener is different from Apps listener)
Try starting stopping services or better open startup / shutdown scripts to check what all they are doing (These are shell files & you can open them by any editor like vi in Unix & notepad on windows)
Friday, June 26, 2009
Apps 11i DBA preparation
As part of your Oracle Apps DBA training will include
roles & responsibilities of oracle Apps DBA.
1. Apps Architecture
This is key topic & you should be very clear about Oracle Applications/E-Business Suite
11i components & Architecture. This is base of your knowledge & if you are not clear about
various components & uses it will be quite difficult in learning Apps.
Where to find Oracle Applications 11i architecture in Ocean of oracle Application
technical documentation. Well I agree with you go straight to http://download-uk.oracle.com/docs/cd/B25516_08/current/acrobat/11iconcepts.pdf and go through chapter 1 (Page 13 to Page 32 Just 20 Pages)
2. Installing Apps 11i
Next point in apps dba training is Oracle Apps 11i Install using Rapid Install preferably on Linux/Unix
Where to find Rapid Install 11i Oracle Apps Guide This is guide by Oracle http://download-uk.oracle.com/docs/cd/B25516_08/current/acrobat/r115102ins.pdf for a start Chapter 1 & 2 are enough page 13 to p 63 is enough to understand Installation)
Where to find Discs / software for Oracle Apps 11i E-Business Suite : You can download it via http://edelivery.oracle.com or order it via your Metalink account . Once you got CD , please do install Apps atleast once in order to understand & to familiarize your self with Oracle Applications
3. Apps 11i File System/Software
Once you installed applications 11i using above guide on Unix/Windows/Linux software then login as Operating System User & check directories while going through document
http://download-uk.oracle.com/docs/cd/B25516_08/current/acrobat/11iconcepts.pdf Chapter 2 Applications File System (P39- 48) very important in understanding Database Server & Application Server Tier & various tops like DATA_TOP, ORA_TOP, APPL_TOP, COMN_TOP, AD_TOP....
If you know your applications 11i File system you know where to find particular component files & logs .
Tuesday, April 28, 2009
Configure SSL to Web Server
Yesterday we looked at SSL overview in Oracle Applications 11i, you can look at that post from link
What is SSL ?
SSL stands for Secure Socket Layer which is protocol developed by Netscape. Data Transferred between Server & Client is Secured (Encrypted)
Why I need a SSL in Oracle Applications ?
Usually data transmitted between client machine & server (Web Server on http protocol & Forms Server on Sockets ) is clear text packets. Any one can put Packet Sniffer between Client machine & Server & can open & read all data transaction between your machine & Server (If he/she has network access) Hacker can get your Username/Password or any sensitive data. This become critical when you have Internet access to Oracle Applications 11i (Usually Self Service Implementation)
Where I need to configure SSL in Apps ?
Communication between Client & Oracle Applications happen via three components.
--Oracle Web Server (Initial Connection & all self service access is via Web Server/Apache). If your Form Server is in servlet Mode then Core Applications are also accessed via Web Server (Jserv Component)
--Oracle Form Server : For Core Oracle Application Access (Forms)
--Database : You access web server which in turn talks to database Server via UTL_HTTP package via dad (/pls/$SID)
So You enable SSL on particular component depending on your requirement & component which is accessible over Internet & should be secured. You can Implement across all three component or only one or any two.
What is common deployment for Internet Facing Oracle Applications ?
Though you can configure SSL for Web, Forms & database for extra Security but Usually most prone & Internet facing component is Web Server (For Self Service Applications) so common trend is to Enable SSL between Client Machine & Web Server (Apache) in Oracle Applications.
What will happen w.r.t. Data communication after enabling SSL ?
By default you access Applications over HTTP (Hyper Text Transfer Protocol) but after enabling SSL on web server you will access via HTTPS (Secure) . Data will be encrypted at one end & decrypted at other end.
Lets continue with where we left yesterday
What happens when we enable SSL in Oracle Web Server ?
I am assuming that SSL is already enabled at web server , so you type url with protocol as https (where s stands for Secure ), web server understand that this is SSL request so Web Server sends its certificates back to client stating its identity & with that its send a Public key which your browser use to encrypt & decrypt message send by Web Server . Web Server uses its private key(known to itself only, stored in either wallet or ssl directory discussed later in this post) & public key(key which is known to everyone) to encrypt & decrypt messages. SSL has build in feature which assures that data is not tempered with its from valid source . If you don't understand all this at this minute don't worry you still can configure SSL. This entire concept is called as PKI (Publick Key Infrastructure)
Myth about SSL Port in webserver ?
Do I need to only Use on port 443 for Web Server SSL Port ?? not at all , port 443 is standard port for HTTPS as port 80 for HTTP. You can use HTTPS on any port as long as port is listening for HTTPS requests .
Overview of Steps in configuring SSL over Web Server in Oracle Apps 11i ?
I am mentioning over view of configuring SSL on web server in Oracle Applications (If you wish to configure SSL for Forms Server & Database Servers ) Steps mentioned here are for Autoconfig Enabled system & Apache 1.0.2.2.2 and higher
1. Create your SSL Certificates (I'll cover later how to generate SSL certificates for Web Server)
2. Configure SSL parameters for web server variables via OAM or by changing Context File (xml file in APPL_TOP) These parameters I'll discuss shortly.
3. Copy SSL Certificates created in step1 above, in SSL directories (Discussed Later) or Wallets (If you are using Oracle Wallets to store your certificates)
4. Run Autoconfig to take new parameters to take into effect
5. Test Applications with SSL
Please note that above steps are for implementing SSL only on Web Server there are additional steps if you want to configure SSL on Form Server & Database Server . (I am not mentioning them here as this is not common)
What is meant by creating SSL Certificates ?
You remember above I discussed that server sends its certificates (public) to browser & uses private key to encrypt & decrypt messages . So steps in creating Certificates are
1. Create Private key using openssl
2. Create certificate request using private key created above
3. Submit request file to Certifying Authority like verisign
4. Get Certificates from certifying Authority (CA)
If you are testing SSL you can use test certificates supplied with Web Server
What are various parameters in XML file (CONTEXT File) w.r.t. SSL ?
s_web_ssl_directory - Directory where SSL certificates are stored
s_url_protocol - https means you are using ssl (Default is http)
s_local_url_protocol - change it to https for SSL
s_webssl_port - Apache SSL port
s_active_webport - same as s_webssl_port
s_webport - same as s_webssl_port
Lot more coming in next post on configure SSL with Oracle Apps 11i...
SSL Overview in Apps
Today I am going to cover overview of SSL & various components of oracle Apps in which you can configure SSL.
What is SSL ?
SSL stands for Secure Socket Layer which is protocol developed by Netscape. Data Transferred between Server & Client is Secured (Encrypted)
Why I need a SSL in Oracle Applications ?
Usually data transmitted between client machine & server (Web Server on http protocol & Forms Server on Sockets ) is clear text packets. Any one can put Packet Sniffer between Client machine & Server & can open & read all data transaction between your machine & Server (If he/she has network access) Hacker can get your Username/Password or any sensitive data. This become critical when you have Internet access to Oracle Applications 11i (Usually Self Service Implementation)
Where I need to configure SSL in Apps ?
Communication between Client & Oracle Applications happen via three components.
--Oracle Web Server (Initial Connection & all self service access is via Web Server/Apache). If your Form Server is in servlet Mode then Core Applications are also accessed via Web Server (Jserv Component)
--Oracle Form Server : For Core Oracle Application Access (Forms)
--Database : You access web server which in turn talks to database Server via UTL_HTTP package via dad (/pls/$SID)
So You enable SSL on particular component depending on your requirement & component which is accessible over Internet & should be secured. You can Implement across all three component or only one or any two.
What is common deployment for Internet Facing Oracle Applications ?
Though you can configure SSL for Web, Forms & database for extra Security but Usually most prone & Internet facing component is Web Server (For Self Service Applications) so common trend is to Enable SSL between Client Machine & Web Server (Apache) in Oracle Applications.
What will happen w.r.t. Data communication after enabling SSL ?
By default you access Applications over HTTP (Hyper Text Transfer Protocol) but after enabling SSL on web server you will access via HTTPS (Secure) . Data will be encrypted at one end & decrypted at other end.
More on
How Data Encryption Happens ....
Is there any performance overheads ....
What is openssl & oracle Wallets ...
How to configure SSL in Oracle Apps 11i ...
and lot more on SSL coming in Next Post
How to change Hostname on Apps Instance
You sometime have to change hostname or domainname of your Apps Instance , today's post list various options & things you need to note while changing hostname on your existing Apps Instance.
Use cloning for changing hostname or domainname
I am sure you might be surprised to see how cloning can change hostname or domainname , yes you are right cloning will not change host or domain name but cloning can be used to change pointers to old hostname or domainname in Apps Instance after changing hostname/domainname by operating system commands. Steps you have to do is
Run adpreclone on Instance where you want to change hostname/domainname
Release Unix/Linux machine to sysadmin for changing hostname
Run postclone with new hostname/domain with same SID to change new name into effect
Above method is easy & best which I can think .
Use Autoconfig to change hostname or domainname of machine hosting apps Instance
If Machine on which you want to change hostname/domainname is on application tier then you just change entries in $CONTEXT_NAME.xml
Change hostname or domainname using operating system commands
execute autoconfig on that Instance so that application tier register new hostname/domainname
If machine on which you want to change host/domain name also host Database Tier then you also need to Deregister database tier from Net Service Topology Model & Reregister it with new hostname settings.
If you want to learn more about Net Service Topology Model follow Metalink Note # 218089.1 Autoconfig FAQ Under Section Net Services Question 28 to 41
For exact steps on how to change hostname using Autoconfig follow Metalink Note # 338003.1 How to change the hostname and/or port of the Database Tier using AutoConfig
I recently completed OCA for Application Server Exam 1Z0-311 and will be sharing my experience with Oracle Certification for Application Server with you all. Stay tuned on Oracle Application Server Certification 1Z0-311 & lot more things.
Your feedback/comment is quite important for improving this blog so feel free to leave your comments & suggestions
Standby Site for Apps 11i
Lets continue from last two post on Dataguard which are at
Today I am going to cover Dataguard which is used for business continuity for Oracle Applications 11i including fusion middleware (Using AS Guard). There are two types of standby databases Physical Standby Database & Logical Standby database. Since oracle applications currently support only physical standby database , I am going to cover only physical standby databases.
Overview of Dataguard & Dataguard Broker
Dataguard consist of one primary database & one or more standby database where primary & standby databases are connected by sqlnet (How to configure this check in coming posts). These primary & standby database can be monitored by command line (sql) as well from GUI (Graphical User Interface) Tool called as Dataguard broker.
Important Services in Dataguard configuration
Two very important services in dataguard configuration are Redo Transport Service & Log Apply Services. In order to keep standby database in synch with primary database ; redo transport service transfer(Pull/Push) redo logs from primary to standby database & Log apply service applies that redo logs to standby database.
Switchover & Failover
These are basically two kind of roles in dataguard Failover & Switchover; In Switchover Primary database becomes standby database & one of (If there are more than one standby) standby database becomes primary database for ex. during server maintenance. Failover is used in scenarion in which your primary database is not available and you want to convert role of one of standby database to primary database for ex. during primary database failure.
Data Protection Mode
Standby database in dataguard configuration can be configured in any of three protection mode which can be changed later as well depending on your requirement . These protection modes are Maximum Protection Mode , Maximum Availability Mode & Maximum Performance Mode.
Maximum Protection Mode
In maximum protection mode as name suggest no data loss will occur if primary database fails. This is achieved by oracle by ensuring that redo data must be written to both local online redo log location & standby redo log location before transaction commits. This standby redo log will ensure full data protection. For full protection mode atleast one standby database should have standby redo log and LGWR, SYNC, and AFFIRM attribute should be used with LOG_ARCHIVE_DEST_n parameter. (I am going to discuss about these parameters in next post)
Here your primary database will shutdown if it is unable to write redo records to atleast one standby location.
Maximum Availability Mode
This is similar to Maximum protection mode except that it will not shutdown primary database if primary database is not able to write standby redo logs to atleast one standby location but in that case Maximum Availability will act in Maximum Performance Mode until fault is corrected and all gaps in redo logs are resolved. Once all gaps are resolved primary database will automatically goes into Maximum Availability Mode.
Maximum Performance Mode
This is default mode in which redo stream is written asynchronously with respect to the commitment of the transactions that create the redo data. You can use LGWR and ASYNC attribute or ARCH attribute in LOG_ARCHIVE_DEST_n
You can check your database mode as
SQL> select PROTECTION_LEVEL from v$database;
PROTECTION_LEVEL
----------------------------
MAXIMUM PERFORMANCE
Today I am going to cover step by step configuration for Oracle Dataguard & may be in next or future posts I will discuss on common mistakes which you can do while configure dataguard / standby database.
Below steps are based on assumptions that Primary Database is on Machine1.domain.com & Standby database is on Machine2.domain.com . Database Instance Name is PROD and database listener is listening on port 1525. Mount point on primary & standby database are same (If they are not you need to set parameter db_file_convert)
Assumptions
I am assuming using LGWR, ASYNC option with log shipping service which means ,
LGWR (Log Writer process will be used to write to standby site instead of ARC archiver process)
ASYNC (Redo logs to standby is asynchronous to primary site)
You may have to change options with log shipping service (LOG_ARCHIVE_DEST_n) depending on data protection mode you wish to choose. (I am using Maximum Performance Mode - Default Mode)
Enable Archive log
For standby database configuration your primary database should be running in achieve log mode. In order to convert your primary database into archive log mode follow these steps
SQL> SHUTDOWN
SQL> STARTUP MOUNT
SQL> ALTER DATABASE ARCHIVELOG;
SQL> ALTER DATABASE OPEN;
SQL> alter system set LOG_ARCHIVE_DEST_1 ='LOCATION=/u01/oracle/data/arch' scope=spfile; (I am assuming that you are using spfile here , if you are using pfile skip scope=spfile)
SQL> alter system set LOG_ARCHIVE_DEST_2 ='SERVICE=PROD_remote1.domain.com LGWR ASYNC REOPEN=60' scope=spfile; (We will create above TNS Alias in next step)
SQL> alter system log_archive_dest_2='DEFER' (Defer this until you have standby system Up)
SQL> shutdown immediate
SQL> startup
You should see archive logs generated after this on standby site
Enable Force Logging
You should enable Force logging in primary database else if some transaction which doesn't generate redo log can corrupt your standby database. (Careful in OLTP transactions or long running requests in Apps)
SQL> ALTER DATABASE FORCE LOGGING;
Set Initialization Parameter
SQL> alter system set fal_client = Â’PROD.domainname.comÂ’ scope=both;
SQL> alter system set fal_server = Â’PROD_remote1.domainnameÂ’ scope=both;
(Here FAL, Fetch Archive Log is used to fetch archives in case gap in archives arises because of any reason)
SQL> alter system set STANDBY_FILE_MANAGEMENT=AUTO scope=both; (This is used to automatically generate file in standby site like if you add a datafile, this will create one in standby site as well)
Create Standby Control file & copy datafile including oracle_home
Create standby control file as
SQL> alter DATABASE CREATE STANDBY CONTROLFILE AS '/u01/oracle/home/standby.ctl'
You can installed New Database on standby site or Use ORACLE_HOME software from primary site on standby site.
Copy datafiles, redologs, initializations file, tnsnames.ora, listener.ora & control file from primary site to standby site.
Today lets conclude dataguard/standby configuration & look at Metalink note on Dataguard configuration in Apps 11i with database 9i & 10g.
After creating standby control file and moving datafiles, redo log, control file,tnsnames.ora to standby site , start standby database as mentioned below using standby control file.
SQL> startup mount
In order to put standby database in managed recovery you can use
SQL> ALTER DATABASE RECOVER MANAGED STANDBY DATABASE DISCONNECT FROM SESSION; (On standby site)
To Cancel recovery you can use
SQL> ALTER DATABASE RECOVER MANAGED STANDBY DATABASE CANCEL;
All these sql's are available in Standby Configuration guide so your can refer guide mentioned in my first post on standby database.
Failover/Switchover
Failover is used if you loose your primary database or wish to break relationship between primary & standby database & convert standby database in to primary database.
Switchover is used to change role of primary to standby & vice versa.
For configuring Dataguard as Disaster Recovery solution in Oracle Applications 11i use Metalink Note # 216212.1 Business Continuity for Oracle Applications Release 11i, Database Releases 9i and 10g
Next level of Business Continuity is Application Server Guard (Currently for Standalone Application Server only) which includes middle tier recovery including database. AS Guard (Application Server Guard) also called as DSA is used for seamless Integration of Disaster Recovery solution for both Middle Tier & Database Tier. I am going to cover how to configure AS Guard in future.
Stay tuned to learn how to configure Single Sign On (SSO) access to HTMLDB / Apex Applications ......
Configure Dataguard / Standby database
Yesterday we looked at Data Guard overview in Oracle Database
Today I am going to cover Dataguard which is used for business continuity for Oracle Applications 11i including fusion middleware (Using AS Guard). There are two types of standby databases Physical Standby Database & Logical Standby database. Since oracle applications currently support only physical standby database , I am going to cover only physical standby databases. Overview of Dataguard & Dataguard BrokerDataguard consist of one primary database & one or more standby database where primary & standby databases are connected by sqlnet (How to configure this check in coming posts). These primary & standby database can be monitored by command line (sql) as well from GUI (Graphical User Interface) Tool called as Dataguard broker.Important Services in Dataguard configurationTwo very important services in dataguard configuration are Redo Transport Service & Log Apply Services. In order to keep standby database in synch with primary database ; redo transport service transfer(Pull/Push) redo logs from primary to standby database & Log apply service applies that redo logs to standby database.Switchover & FailoverThese are basically two kind of roles in dataguard Failover & Switchover; In Switchover Primary database becomes standby database & one of (If there are more than one standby) standby database becomes primary database for ex. during server maintenance. Failover is used in scenarion in which your primary database is not available and you want to convert role of one of standby database to primary database for ex. during primary database failure.Data Protection Mode Standby database in dataguard configuration can be configured in any of three protection mode which can be changed later as well depending on your requirement . These protection modes are Maximum Protection Mode , Maximum Availability Mode & Maximum Performance Mode. Maximum Protection Mode In maximum protection mode as name suggest no data loss will occur if primary database fails. This is achieved by oracle by ensuring that redo data must be written to both local online redo log location & standby redo log location before transaction commits. This standby redo log will ensure full data protection. For full protection mode atleast one standby database should have standby redo log and LGWR, SYNC, and AFFIRM attribute should be used with LOG_ARCHIVE_DEST_n parameter. (I am going to discuss about these parameters in next post)Here your primary database will shutdown if it is unable to write redo records to atleast one standby location.Maximum Availability ModeThis is similar to Maximum protection mode except that it will not shutdown primary database if primary database is not able to write standby redo logs to atleast one standby location but in that case Maximum Availability will act in Maximum Performance Mode until fault is corrected and all gaps in redo logs are resolved. Once all gaps are resolved primary database will automatically goes into Maximum Availability Mode.Maximum Performance ModeThis is default mode in which redo stream is written asynchronously with respect to the commitment of the transactions that create the redo data. You can use LGWR and ASYNC attribute or ARCH attribute in LOG_ARCHIVE_DEST_nYou can check your database mode asSQL> select PROTECTION_LEVEL from v$database;PROTECTION_LEVEL----------------------------MAXIMUM PERFORMANCE
Below steps are based on assumptions that Primary Database is on Machine1.domain.com & Standby database is on Machine2.domain.com . Database Instance Name is PROD and database listener is listening on port 1525. Mount point on primary & standby database are same (If they are not you need to set parameter db_file_convert)
Assumptions
I am assuming using LGWR, ASYNC option with log shipping service which means ,
LGWR (Log Writer process will be used to write to standby site instead of ARC archiver process)
ASYNC (Redo logs to standby is asynchronous to primary site)
You may have to change options with log shipping service (LOG_ARCHIVE_DEST_n) depending on data protection mode you wish to choose. (I am using Maximum Performance Mode - Default Mode)
Enable Archive log
For standby database configuration your primary database should be running in achieve log mode. In order to convert your primary database into archive log mode follow these steps
SQL> SHUTDOWN
SQL> STARTUP MOUNT
SQL> ALTER DATABASE ARCHIVELOG;
SQL> ALTER DATABASE OPEN;
SQL> alter system set LOG_ARCHIVE_DEST_1 ='LOCATION=/u01/oracle/data/arch' scope=spfile; (I am assuming that you are using spfile here , if you are using pfile skip scope=spfile)
SQL> alter system set LOG_ARCHIVE_DEST_2 ='SERVICE=PROD_remote1.domain.com LGWR ASYNC REOPEN=60' scope=spfile; (We will create above TNS Alias in next step)
SQL> alter system log_archive_dest_2='DEFER' (Defer this until you have standby system Up)
SQL> shutdown immediate
SQL> startup
You should see archive logs generated after this on standby site
Enable Force Logging
You should enable Force logging in primary database else if some transaction which doesn't generate redo log can corrupt your standby database. (Careful in OLTP transactions or long running requests in Apps)
SQL> ALTER DATABASE FORCE LOGGING;
Set Initialization Parameter
SQL> alter system set fal_client = Â’PROD.domainname.comÂ’ scope=both;
SQL> alter system set fal_server = Â’PROD_remote1.domainnameÂ’ scope=both;
(Here FAL, Fetch Archive Log is used to fetch archives in case gap in archives arises because of any reason)
SQL> alter system set STANDBY_FILE_MANAGEMENT=AUTO scope=both; (This is used to automatically generate file in standby site like if you add a datafile, this will create one in standby site as well)
Create Standby Control file & copy datafile including oracle_home
Create standby control file as
SQL> alter DATABASE CREATE STANDBY CONTROLFILE AS '/u01/oracle/home/standby.ctl'
You can installed New Database on standby site or Use ORACLE_HOME software from primary site on standby site.
Copy datafiles, redologs, initializations file, tnsnames.ora, listener.ora & control file from primary site to standby site.
Other steps & few important things w.r.t. dataguard coming in Next Post...
Today I am going to cover Dataguard which is used for business continuity for Oracle Applications 11i including fusion middleware (Using AS Guard). There are two types of standby databases Physical Standby Database & Logical Standby database. Since oracle applications currently support only physical standby database , I am going to cover only physical standby databases. Overview of Dataguard & Dataguard BrokerDataguard consist of one primary database & one or more standby database where primary & standby databases are connected by sqlnet (How to configure this check in coming posts). These primary & standby database can be monitored by command line (sql) as well from GUI (Graphical User Interface) Tool called as Dataguard broker.Important Services in Dataguard configurationTwo very important services in dataguard configuration are Redo Transport Service & Log Apply Services. In order to keep standby database in synch with primary database ; redo transport service transfer(Pull/Push) redo logs from primary to standby database & Log apply service applies that redo logs to standby database.Switchover & FailoverThese are basically two kind of roles in dataguard Failover & Switchover; In Switchover Primary database becomes standby database & one of (If there are more than one standby) standby database becomes primary database for ex. during server maintenance. Failover is used in scenarion in which your primary database is not available and you want to convert role of one of standby database to primary database for ex. during primary database failure.Data Protection Mode Standby database in dataguard configuration can be configured in any of three protection mode which can be changed later as well depending on your requirement . These protection modes are Maximum Protection Mode , Maximum Availability Mode & Maximum Performance Mode. Maximum Protection Mode In maximum protection mode as name suggest no data loss will occur if primary database fails. This is achieved by oracle by ensuring that redo data must be written to both local online redo log location & standby redo log location before transaction commits. This standby redo log will ensure full data protection. For full protection mode atleast one standby database should have standby redo log and LGWR, SYNC, and AFFIRM attribute should be used with LOG_ARCHIVE_DEST_n parameter. (I am going to discuss about these parameters in next post)Here your primary database will shutdown if it is unable to write redo records to atleast one standby location.Maximum Availability ModeThis is similar to Maximum protection mode except that it will not shutdown primary database if primary database is not able to write standby redo logs to atleast one standby location but in that case Maximum Availability will act in Maximum Performance Mode until fault is corrected and all gaps in redo logs are resolved. Once all gaps are resolved primary database will automatically goes into Maximum Availability Mode.Maximum Performance ModeThis is default mode in which redo stream is written asynchronously with respect to the commitment of the transactions that create the redo data. You can use LGWR and ASYNC attribute or ARCH attribute in LOG_ARCHIVE_DEST_nYou can check your database mode asSQL> select PROTECTION_LEVEL from v$database;PROTECTION_LEVEL----------------------------MAXIMUM PERFORMANCE
Today I am going to cover step by step configuration for Oracle Dataguard & may be in next or future posts I will discuss on common mistakes which you can do while configure dataguard / standby database.
Below steps are based on assumptions that Primary Database is on Machine1.domain.com & Standby database is on Machine2.domain.com . Database Instance Name is PROD and database listener is listening on port 1525. Mount point on primary & standby database are same (If they are not you need to set parameter db_file_convert)
Assumptions
I am assuming using LGWR, ASYNC option with log shipping service which means ,
LGWR (Log Writer process will be used to write to standby site instead of ARC archiver process)
ASYNC (Redo logs to standby is asynchronous to primary site)
You may have to change options with log shipping service (LOG_ARCHIVE_DEST_n) depending on data protection mode you wish to choose. (I am using Maximum Performance Mode - Default Mode)
Enable Archive log
For standby database configuration your primary database should be running in achieve log mode. In order to convert your primary database into archive log mode follow these steps
SQL> SHUTDOWN
SQL> STARTUP MOUNT
SQL> ALTER DATABASE ARCHIVELOG;
SQL> ALTER DATABASE OPEN;
SQL> alter system set LOG_ARCHIVE_DEST_1 ='LOCATION=/u01/oracle/data/arch' scope=spfile; (I am assuming that you are using spfile here , if you are using pfile skip scope=spfile)
SQL> alter system set LOG_ARCHIVE_DEST_2 ='SERVICE=PROD_remote1.domain.com LGWR ASYNC REOPEN=60' scope=spfile; (We will create above TNS Alias in next step)
SQL> alter system log_archive_dest_2='DEFER' (Defer this until you have standby system Up)
SQL> shutdown immediate
SQL> startup
You should see archive logs generated after this on standby site
Enable Force Logging
You should enable Force logging in primary database else if some transaction which doesn't generate redo log can corrupt your standby database. (Careful in OLTP transactions or long running requests in Apps)
SQL> ALTER DATABASE FORCE LOGGING;
Set Initialization Parameter
SQL> alter system set fal_client = Â’PROD.domainname.comÂ’ scope=both;
SQL> alter system set fal_server = Â’PROD_remote1.domainnameÂ’ scope=both;
(Here FAL, Fetch Archive Log is used to fetch archives in case gap in archives arises because of any reason)
SQL> alter system set STANDBY_FILE_MANAGEMENT=AUTO scope=both; (This is used to automatically generate file in standby site like if you add a datafile, this will create one in standby site as well)
Create Standby Control file & copy datafile including oracle_home
Create standby control file as
SQL> alter DATABASE CREATE STANDBY CONTROLFILE AS '/u01/oracle/home/standby.ctl'
You can installed New Database on standby site or Use ORACLE_HOME software from primary site on standby site.
Copy datafiles, redologs, initializations file, tnsnames.ora, listener.ora & control file from primary site to standby site.
Other steps & few important things w.r.t. dataguard coming in Next Post...
Dataguard Overview
Today I am going to cover Dataguard which is used for business continuity for Oracle Applications 11i including fusion middleware (Using AS Guard). There are two types of standby databases Physical Standby Database & Logical Standby database. Since oracle applications currently support only physical standby database , I am going to cover only physical standby databases.
Overview of Dataguard & Dataguard Broker
Dataguard consist of one primary database & one or more standby database where primary & standby databases are connected by sqlnet (How to configure this check in coming posts). These primary & standby database can be monitored by command line (sql) as well from GUI (Graphical User Interface) Tool called as Dataguard broker.
Important Services in Dataguard configuration
Two very important services in dataguard configuration are Redo Transport Service & Log Apply Services. In order to keep standby database in synch with primary database ; redo transport service transfer(Pull/Push) redo logs from primary to standby database & Log apply service applies that redo logs to standby database.
Switchover & Failover
These are basically two kind of roles in dataguard Failover & Switchover; In Switchover Primary database becomes standby database & one of (If there are more than one standby) standby database becomes primary database for ex. during server maintenance. Failover is used in scenarion in which your primary database is not available and you want to convert role of one of standby database to primary database for ex. during primary database failure.
Data Protection Mode
Standby database in dataguard configuration can be configured in any of three protection mode which can be changed later as well depending on your requirement . These protection modes are Maximum Protection Mode , Maximum Availability Mode & Maximum Performance Mode.
Maximum Protection Mode
In maximum protection mode as name suggest no data loss will occur if primary database fails. This is achieved by oracle by ensuring that redo data must be written to both local online redo log location & standby redo log location before transaction commits. This standby redo log will ensure full data protection. For full protection mode atleast one standby database should have standby redo log and LGWR, SYNC, and AFFIRM attribute should be used with LOG_ARCHIVE_DEST_n parameter. (I am going to discuss about these parameters in next post)
Here your primary database will shutdown if it is unable to write redo records to atleast one standby location.
Maximum Availability Mode
This is similar to Maximum protection mode except that it will not shutdown primary database if primary database is not able to write standby redo logs to atleast one standby location but in that case Maximum Availability will act in Maximum Performance Mode until fault is corrected and all gaps in redo logs are resolved. Once all gaps are resolved primary database will automatically goes into Maximum Availability Mode.
Maximum Performance Mode
This is default mode in which redo stream is written asynchronously with respect to the commitment of the transactions that create the redo data. You can use LGWR and ASYNC attribute or ARCH attribute in LOG_ARCHIVE_DEST_n
You can check your database mode as
SQL> select PROTECTION_LEVEL from v$database;
PROTECTION_LEVEL
----------------------------
MAXIMUM PERFORMANCE
How to change protection modes..
How many standby database Instance you can configure ...
explanation on Log apply, log transport service , FAL Server/Client ....
Step by step configuration of standby database using dataguard ..
Coming soon...
References
http://download-uk.oracle.com/docs/cd/B19306_01/server.102/b14239/toc.htm
HTTP layer Load balancing in Apps 11i
I am going to cover most common load balancer setup in Oracle Apps 11i i.e. Setup Two or more Middle tier with Web Server & Form Server with Hardware Load balancer in front of middle tier . This type of setup is also called as "HTTP Layer Hardware Load balancing" in Oracle Applications.
![[lbr.JPG]](https://blogger.googleusercontent.com/img/b/R29vZ2xl/AVvXsEghM-vyE8PtzEvphdhpzUn4o4O9cOqkH4g9LJzf-T7wqyMuCIWdhXbc5kg9KXcqUAQnxpyXiNhbFtX9lQB1F41jo3j95uR1RsjFwryizUG9BIza7QnIcctNPLXqHCnNYTluNu7mEzVVKDc/s1600/lbr.JPG)
For overview & basics of Load balancing visit my previous post at
http://reddba.blogspot.com/
Below are steps you need to follow to configure Multiple Middle Tier (Web & Forms Server ) with Hardware Load balancer in front.

For overview & basics of Load balancing visit my previous post at
http://reddba.blogspot.com/
Below are steps you need to follow to configure Multiple Middle Tier (Web & Forms Server ) with Hardware Load balancer in front.
1. Setup a Load balancer such that it forwards requests to first middle tier only.
2. Make sure sticky bit is set on load balancer for session persistence (Check Load balancer documentation), You can Network level switch as well to send requests to multiple middle tier
3. Apply Prereq. patches (3175852, 3077386, 3209878)
4. Edit following entry in XML or Context File directly ($APPL_TOP/admin/$CONTEXT_NAME.xml) or via Oracle Application Manager
-- 4.1 "Web entry point Host" to the HTTP load-balancer machine name
-- 4.2 "Web entry point Domain" to the HTTP load-balancer domain name
-- 4.3 "Web entry protocol" to the HTTP load-balancer protocol e.g. "http" or "https"
-- 4.4 "Active Web Port" to the value of the HTTP load-balancer's external port
-- 4.5 "Login Page" to include "Web entry protocol"://"Web Host entry point"."Web domain entry point":"Active Web Port"
-- 4.6 "disco_machine" to load balancer machine
5. Run Autoconfig
6. Start Services & check if you can login to applications via Load balancer
7. Now clone this middle tier to another node (where you want to add another node)
8. Make sure above parameter are pointing to load balancer in second node as well
9. Change load balancer to point to second node only
10. shutdown services on first node
11. try accessing application from second node (you should be able to access application without issues)
11.1 -- If forms are not opening properly , check "ICX Form Launcher .." Profile option should point to load balancer
12. Now start application on both middle tier
13. Point load balancer to both middle tier
14. You should be able to access applications
Things to Note :
------------------
Above solution is for HTTP Layer load balancing & HTTP Server will forward Forms request to form server running on same node .
Related Links
Metalink Note : 217368.1 Advanced Configurations and Topologies for Enterprise Deployments of E-Business Suite 11i
http://reddba.blogspot.com/
Load Balancer Config
Yesterday I discussed about Overview of Load balancer and various types of load balancer as you can configure load balancer at various levels like
- DNS Layer Load balancing
- HTTP Server level Hardware Load balancing(Discussed today)
- Jserv level load balancing (I'll discuss after HTTP level load balancing)
Today in this post I am discussing only at HTTP Server level Hardware Load balancer.
Before configuring Load balancer in Oracle Apps , you should be familiar with following technologies
1. Cloning
Check my previous post to know about cloning
Cloning Basics
Cloning Part I
Cloning Part II
Metalink Note # 230672.1 Cloning Oracle Applications Release 11i with Rapid Clone
2. Load Balancer Basics
Check my previous post for Over of Load balancer
Load Balancer Overview
3. Autoconfig
Check About Autoconfig on My Site
Metalink Note 165195.1 Using AutoConfig to Manage System Configurations with Oracle Applications 11i
Broad Level steps for configuring Hardware Load balancer at HTTP Server layer
A. Configure Hardware Load Balancer for Session Persistence
B. Apply Prereq. Patch (If you are not on 11.5.10 or higher)
C. Add additional Web Node using Rapid Clone
D. Configure Load balancer on Node1
E. Test Load balancer via Node1
F. Configure Load balancer on Node2
G. Test Load balancer via Node2
H. Test Load balancer is sending requests to both nodes when both Web Nodes are Up
Yesterday I posted that you need extra attention while configuring Load balancer at HTTP layer is about
Session Persistence - Hardware level Load Balancer should be configured for session persistence also called as stickness or sticky bit for Oracle Apps 11i . If this is not set & lets assume client1 first request went to Node1 after authentication if next request for client1 goes to Node2 who is not aware of client1 's previous request will throw authentication again. Don't worry about how to set it, ask vendor or Unix Administrator to set sticky bit or session persistence .
Now you have broad overview of configuring Load balancer at HTTP layer, I'll discuss in detail why you need to apply above patches & what all step by step configuration and parameters which needs to be changed and reasoning behind those changes . Till then check for Cloning, Autoconfig.
Load Balancer Overview
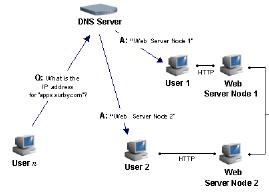 What is Load Balancer in Oracle Applications 11i ? As name suggest its used to balance load on oracle applications, so lets say you initially sized (How to size server configuration in your apps 11i Instance during Implementation coming soon..) your server for 100 concurrent users & now additional 90 users started using your system , you can configure one more Application Tier node & distribute load of 190 users across two application tier node by configuring load balancer (Currently I am discussing only about Application Tier & once you are comfortable with Middle Tier I'll discuss on database tier) Why I need load balancer in Apps 11 ? Is Increased load only reason for introducing load balancer in Apps 11i , No not at all . There are other reasons as well like (These are more advanced reasons & if you don't understand don't worry read it for understanding purpose at this minute) - You want to Hide Server Name so instead of users accessing it via http://hostname:port you want users to access by http://somefancyname.com use load balancer (I know you can do this by various other ways as well like reverse proxy, via dns ..) - You want on some node only web server & some both form server & web server and there can lot of other reason why you need load balancer (May be you want to put it in your CV that you know how to configure load balancer, I know this is stupid reason :) ) What is Role of Load balancer in Oracle Application 11i ? Usually load balancer act as mediator in passing your request to respective Middle Tiers (Usually web server ), so lets say you have configured load balancer in front of two middle tier which are part of your Applications 11i lets call them MT1 & MT2 . Load balancer will accept client's request and pass on to MT1 & MT2 ( round robin or the way you have configured load balancer, you here is Unix Administrators) What are different kind of load balancer ? Session Persistent - These kind of load balancers assign request from a client to same Application Tier. so lets say user1 tried connecting applications via load balancer and LB sent that request to MT1 then in future LB will send requests from user1 always to MT1 for time being specified in session persistence duration parameter specified in LB configuration or till user logs out from Applications. This property is called as Stickness or sticky Bit Non Session Persistent - These kind assign request to MT in round robin way so lets assume user1 requested for login page , LB sends this request to MT1 then user1 again clicked on user responsibility and this time LB sent request from user1 to second middle tier i.e. MT2 Other types of LB, I am not discussing here as these are not required at this minute What all different kind of load balancing options available in Oracle 11i ? DNS Level Load Balancing ( Check image at top , this represent DNS level LB) HTTP Layer Load balancing (You need hardware load balancer which accepts http requests) Jserv Load balancing (This is example of software load balancer, via mod_oprocmgr Process Manager Module) Forms level load balancing - Jserv load balancing via forms servlets (More coming in future) , forms metrics server adfmsctl.sh How to configure Load Balancer in Oracle Apps 11i ? Coming in Next post... Things which need Extra Attention while Configuring Load Balancer in front of Oracle Apps Web Server Coming in Next post... How to confirm if load balancer is sending requests to all nodes which are configured for load balancer ? Coming in Next post... Where to find documents to configure Load Balancer ? Coming in Next post... |
| |
Upgrade Apps to 11.5.10.2
This post is coming bit late & I know lot of you might be wondering when Oracle Apps R12 is in market why I am still writing on 11.5.10 Upgrade . Looking at quesries/doubts/document request by many of my readers in mail and in forum at http://reddba.blogspot.com/I thought of covering entire 11.5.10 upgrade and its related docs in this post.
This post will focus on 11.5.10.2 which is oracle apps version 11.5.10 with CU 2 and patch number is 3480000 and related metalink note is 316365.1 . Minimum prereq AD patch for 11.5.10.2 is AD.I.2 (4337683)
Please Note:
1. Patch 348000 (11.5.10.2) is for 11.5.9 or lower version , If you are already on 11.5.10 and which to apply CU2 then this is not right patch for you.
2. Steps mentioned here are for upgarding your apps version 11.5.X , This post doesn't cover upgrade procedure from 10.7 or 11.0.3
3. If you have language other than US then you have to apply translated version of patch as well
4. To reduce Upgrade downtime you can use staged APPL_TOP methodology mentioned in metalink note # 242480.1 Using a Staged Applications 11i System to Reduce Patching Downtime
5. MRC schema is no more used from 11.5.10 onwards so you can drop MRC schema after upgrade so there is no need to maintain/synchronize MRC before or after 11.5.10 (CU2) upgrade
6. 11.5.10.2 requires database version 9.2.X and higher so you can upgarde to 9.2.X or 10.1.X before Upgarde . If you wish to upgrade to database 10.2.X then its better you do it after 11.5.10.2 Update.
7. Since I upgraded Financial & HRMS system so I will focus on steps related to these module but check optional steps mentioned in metalink note # 316365.1 , There are some additional steps for Windows which are not covered in this post
8. To reduce patch downtime online help patches can be applied at later stage
A) Pre Update task
Compulsory Steps
-----------------
A.1 As mentioned above apply AD.I.2
A.2 Update Autoconfig Tech Stack template files - Autoconfig uses Template files to build files specific to your applications
A.3 Run Technology Validation Utility - This will test minimum tech stack components required to run 11.5.10.2 (Tech Stack components are database, forms & reports, discoverer, Jinitiator, JDK, OJSP, JDBC, libraries for web & form server )
A.4 Check OATM step mentioned in optional steps below. If you are not migrating to OATM mentioned above then prepare your table space to include new space requirement and new products . Read me of patch 3180164 will help you in creating additional tablespaces.
Optional Steps
----------------
A.5 Manual Update script - Run this script to find optional & compulsory manual steps you should do before upgarding (This script is specific to an Instance and vary instance to instance)
A.6 Convert database to OATM (Earlier tablespace were based on OFA/Optimal Flexible Architecture where each product used to have one data & one index tablespaces so there were around 200+ tablespace which was difficult to manage which is now moved to ATM/Application Tablespace Model which is simple to manage & there are around 15 table spaces)
A.7 This steps is only required if you are using audit trails & shadow tables name > 26 characters. For auditing purpose you may have auiting enabled for Instance which you want to upgrade then you must change shadow table names (I will cover more on auditing in oracle applications in coming post) before any new columns can be added . HRMS & Payroll customers with Auditing enabled focus on this. If you are not sure if any of your shadow table name is > 26 then use script FNDATCTBL.sql provided with patch 3872242
A.8 If you are using any of product which require ilog planner libraries then apply related patches
A.9 Unmerge of Contacts from TCA Process is long running process during 11.5.10.2 upgrade process so if you wish to reduce downtime during upgrade
then run this program before upgrade else it will be executed during upgrade
process
Apply Maintenance Pack
===================
1. Shutdown application tier services
2. If your database is not 9i upgrade it now
3. Apply maintenance patch . This is unified driver
4. Apply any additional languages patches (If your installation is multi language)
Post Update task
==============
1. Apply Interoperability patch (If you upgraded database to 10g)
2. Register new product , If you want to use any product installed as part of 11.5.10.2 you have to manually license it via OAM
3. Drop MRC schema (As mentioned above MRC schema is no longer required from
11.5.10)
4. If you are not using HRMS Pack I before upgrading to 11.5.10.2 then you have to apply HR legislative updates
5. There are product specific updates which you should carry out with your
functional consultant.
For complete list and extensive steps to upgrade follow metalink note # 316365.1
URL Firewall in DMZ Setup
In Self Service or DMZ Setup (from 11.5.10) you might have noticed new configuration file url_fw.conf under $IAS_ORACLE_HOME/Apache/Apache/conf . In today's post We'll understand requirement of this file , building blocks of this file, mod_rewrite module of apache and regular expressions.
Overview of url_fw.conf file is required ?
This file is delievered by patch 3942483 (included in 11.5.10) and called by Apache/Webserver configuration file httpd.conf .
This file uses mod_rewrite module of Apache to allow/disallow URL's matched by regular expression.
Why I need this file - > This file provide extra security for DMZ or Self Service implementation accessible over internet. Only few URL's opened/allowed by this file are accessible thus protecting secured URL which should not be accessible via internet.
On what basis its decided to include url_fw.conf -> If node trust level is marked as external (Three type of Node Trust level for a node , External, Internal, Administration) then Autoconfig includes url_fw.conf file in httpd.conf
What is mod_rewrite and where to get more information -> mod_rewrite is URL Rewrite Engine in Apache (on which Oracle-Apache or Oracle HTTP Server or Web Server in Apps). mod_rewrite is powerful tool for URL manipulation like to
- Restrict Access to directories and files
- Conditional redirection of access
- Relocating Servers, File System or Directories
- Regeneration of static pages based on HTTP Header Variable
For more information on mod_rewrite module of apache visit http://httpd.apache.org/docs/1.3/mod/mod_rewrite.html
How to debug mod_rewite issues ?
If you think some of URL's (complete url or partial - gif, jpg, html or jsp file) are blocked by above URL Firewall and you wish to know which file is blocked , you can enable logging by adding following directive in url_fw.conf
RewriteLog "/your_log_directory/rewrite.log"
RewriteLogLevel 7
By default logging is disabled , logLevel value is from 0-10 (0 means no logging and 10 is log everything which records all steps mod_rewrite is doing in background) a sensible value is 6 or 7 and you will see in log what URL is blocked and by what rule; so that if you think user should have access to that URL you can grant access on that resource by adding new rule in url_fw.conf
Sample url_fw.conf value and its meaning -
RewriteRule ^/$ /OA_HTML/AppsLocalLogin.jsp [R,L]
or
RewriteRule ^/OA_HTML/jsp/fnd/fndhelp.jsp$ - [L]
Here first rule is saying that when user type / i.e. after hostname , domainname and port number and then /; redirect user to /OA_HTML/AppsLocalLogin.jsp and stop applying any rewrite rule after that.
In second rule; - which means don't do any thing and present User same url as mentioned in left side i.e. /OA_HTML/jsp/fnd/fndhelp.jsp
here [R,L] in end
R- Means Rewrite
L - Last rewrite rule (No more rule to apply after this)
In order to understand above rules , you should know regular expression and here few tips/meta characters on regular expressions
1) . (dot) means matches any characters
2) [] specifies a class
i.e.
---> [a-z] matches any lower case characters from a to z
--->[a-zA-Z0-9] matches any character upper or lower case from a to z and numeric 0 to 9
---> [abc$] matches a or b or c or $
---> [^0-9] matches anything except digit 0 to 9 . Here ^ is negation
Meta Characters in Regular Expressions
^ -> Matches Start of a line
$ -> Matches End of line
like
^appsdba -> Matches any line starting with appsdba
appsdba$ -> Matches any line ending with appsdba
^appsdba$ -> Matches any line which consist of just one word appsdba
Quantifiers for Characters
--> ? matches zero or one instance of character
--> + matches one or more instance of character
--> * matches zero or more instance of character
For Example
appsdba? matches appsdb or appsdba
appasdba+ matches appsdba, appsdbaa, appsdbaaa and so on
appsdba* matches appsdb, appsdba, appsdbaa, appsdbaaa and so on
Few error messages related to URL Firewall are
-- Access to requested URL has been blocked by the url firewall
-- Gone URL you are looking for is blocked by url Firewall
-- Error in opening up attachments or date picker in iStore, iRec, iProc
-- FW-1 at Firewall-2: Access denied
For more information on DMZ and E-Business Suite visit Steven Chan's post at
http://blogs.oracle.com/schan/2006/05/17
Please leave your comments about anything and things you wish to see on this blog.
Few things on Users Request, coming soon on Oracle Applications R12
-- Startup / Shutdown scripts and changes in scripts with 11i version
-- New Top INSTANCE_TOP and its advantages in Oracle Apps Release 12
Upgarde DB to 10.2.0.2
Next step in installing SOA Suite after installing 10.2.0.1 database is to upgrade this oracle database to version 10.2.0.2 (4547817).
For Oracle Database 10.2.0.1 Installation Step and Software location click here
If you selected Standard Edition during 10.2.0.1 database installation, you can skip this database upgrade step. This is because for Enetrprise Edition Database, SOA Suite is certified only with 9.2.0.7 and higher (in 9i database) or version 10.2.0.2. ( For Standard Edition database 10.2.0.1 is certified with SOA Suite 10.3.0.1).
For detailed information on how to upgrade from 10.2.0.1 database to version 10.2.0.2 follow readme of patch 4547817 or metalink note 316900.1
Few things about 10.2.0.2 patch set
i) 10.2.0.2 patch set is not complete software, You can only apply it on top of existing 10.2.0.X installation.
ii) This patchset on linux can be applied on following version of linux Suse 9, Red Hat AS/ES 3, 4
Pre Installation Steps
-------------------------------
i) Download patch p4547817_10202_LINUX.zip (download patch according to your operating system like windows, solaris..) and copy it to your linux machine
ii) Unzip patch as “unzip p4547817_10202_LINUX.zip”
iii) Set ORACLE_HOME and ORACLE_SID to your database (10.2.0.X) on which you are planning to apply this patchset . In my case its
ORACLE_HOME = /home/oracle/product/10.2.0/db
ORACLE_SID = SOADEV
export ORACLE_HOME ORACLE_SID
(Command to export environment variable differ as per your shell, above command is used for bash, bourne or ksh)
iv) Stop database and database listener as mentioned at end of database installation in my previous post
v) Backup your system (In case anything goes wrong)
Database 10.2.0.2 Patch Set Installation
------------------------------------------------
i) Login as user who installed 10.2.0.X database (In my case its “oracle” )
ii) cd patchset_unzip_directory/DISK1
iii) ./runInstaller
iv) On welcome screen click Next
v) On Specify file location screen, in Name field and Path select Database on which you wish to apply this patch (If you have multiple database installed on your machine you will see drop down menu to select database oracle_home)


vii) In the end when prompted to run root.sh , login as root from another window and execute root.sh in ORACLE_HOME
viii) In the end of installation screen click Exit, and click Yes to exit from Oracle Universal Installer
This step will complete database software upgraded to patchset 10.2.0.2 but we haven’t upgraded our database yet to 10.2.0.2 (In next step we will upgrade our database to 10.2.0.2 version).
Upgrade 10.2.0.X database to 10.2.0.2
----------------------------------------------------
Please note steps mentioned here are for upgrading database to 10.2.0.2 from 10.2.0.X version, for upgrade from previous release (8i, 9i, 10g) refer metalink note mentioned above
i) Make sure you have applied patchset 10.2.0.2 on oracle_home (on which database is installed)
ii) Login as database owner (oracle) and exexute sqlplus “/as sysdba”
iii) SQL> startup upgrade
iv) SQL> spool 10202upgrade.log
v) SQL> @/rdbms/admin/catupgrd.sql
vi) SQL> spool off
(Check if there are any error message in 10202upgarde.log and rerun catupgrd.sql after fixing errors)
In the end of log file (10202upgarde.log) you should see output like below with component version as 10.2.0.2.0

vii) SQL> shutdown
viii) SQL> startup
ix) SQL> @?/rdbms/admin/utlrp.sql
x) SQL> select count(*) from dba_objects where status like ‘INVALID’;
Count (*)
0
xi) SQL> shutdown immediate (After upgrade and invalid object compilation restart your database cleanly)
xii) lsnrctl start
xiii) SQL> startup
This completes your oracle database upgrade to 10.2.0.2 version.
Loading ORABPEL, ORAESB and ORAWSM schema in above database and SOA Suite installation coming next...
For Oracle Database 10.2.0.1 Installation Step and Software location click here
If you selected Standard Edition during 10.2.0.1 database installation, you can skip this database upgrade step. This is because for Enetrprise Edition Database, SOA Suite is certified only with 9.2.0.7 and higher (in 9i database) or version 10.2.0.2. ( For Standard Edition database 10.2.0.1 is certified with SOA Suite 10.3.0.1).
For detailed information on how to upgrade from 10.2.0.1 database to version 10.2.0.2 follow readme of patch 4547817 or metalink note 316900.1
Few things about 10.2.0.2 patch set
i) 10.2.0.2 patch set is not complete software, You can only apply it on top of existing 10.2.0.X installation.
ii) This patchset on linux can be applied on following version of linux Suse 9, Red Hat AS/ES 3, 4
Pre Installation Steps
-------------------------------
i) Download patch p4547817_10202_LINUX.zip (download patch according to your operating system like windows, solaris..) and copy it to your linux machine
ii) Unzip patch as “unzip p4547817_10202_LINUX.zip”
iii) Set ORACLE_HOME and ORACLE_SID to your database (10.2.0.X) on which you are planning to apply this patchset . In my case its
ORACLE_HOME = /home/oracle/product/10.2.0/db
ORACLE_SID = SOADEV
export ORACLE_HOME ORACLE_SID
(Command to export environment variable differ as per your shell, above command is used for bash, bourne or ksh)
iv) Stop database and database listener as mentioned at end of database installation in my previous post
v) Backup your system (In case anything goes wrong)
Database 10.2.0.2 Patch Set Installation
------------------------------------------------
i) Login as user who installed 10.2.0.X database (In my case its “oracle” )
ii) cd patchset_unzip_directory/DISK1
iii) ./runInstaller
iv) On welcome screen click Next
v) On Specify file location screen, in Name field and Path select Database on which you wish to apply this patch (If you have multiple database installed on your machine you will see drop down menu to select database oracle_home)

vi) On summay screen, click Install

vii) In the end when prompted to run root.sh , login as root from another window and execute root.sh in ORACLE_HOME
viii) In the end of installation screen click Exit, and click Yes to exit from Oracle Universal Installer
This step will complete database software upgraded to patchset 10.2.0.2 but we haven’t upgraded our database yet to 10.2.0.2 (In next step we will upgrade our database to 10.2.0.2 version).
Upgrade 10.2.0.X database to 10.2.0.2
----------------------------------------------------
Please note steps mentioned here are for upgrading database to 10.2.0.2 from 10.2.0.X version, for upgrade from previous release (8i, 9i, 10g) refer metalink note mentioned above
i) Make sure you have applied patchset 10.2.0.2 on oracle_home (on which database is installed)
ii) Login as database owner (oracle) and exexute sqlplus “/as sysdba”
iii) SQL> startup upgrade
iv) SQL> spool 10202upgrade.log
v) SQL> @/rdbms/admin/catupgrd.sql
vi) SQL> spool off
(Check if there are any error message in 10202upgarde.log and rerun catupgrd.sql after fixing errors)
In the end of log file (10202upgarde.log) you should see output like below with component version as 10.2.0.2.0

vii) SQL> shutdown
viii) SQL> startup
ix) SQL> @?/rdbms/admin/utlrp.sql
x) SQL> select count(*) from dba_objects where status like ‘INVALID’;
Count (*)
0
xi) SQL> shutdown immediate (After upgrade and invalid object compilation restart your database cleanly)
xii) lsnrctl start
xiii) SQL> startup
This completes your oracle database upgrade to 10.2.0.2 version.
Loading ORABPEL, ORAESB and ORAWSM schema in above database and SOA Suite installation coming next...
Install Database 10.2.0.1
In next few posts I’ll cover installation of SOA Suite (Service Oriented Architecture Suite) which is one of the components in Oracle Fusion Middleware. For more information on Oracle Fusion Middleware and its various components and overview visit
Fusion Middleware Part I
Fusion Middleware Part I
--In order to install SOA suite version 10.1.3.X you need Database version 10.2.X or higher to hold schema for BPEL, ESB, WSM ....
--This database can exist on same machine (but under different ORACLE_HOME) or can be on different machine where you are planning to install SOA.
--For this installation demo, I installing Database release 10.2.0.1 on same machine under ORACLE_HOME.
--This demo installation is on Redhat Linux ES 3 which is on VMWare.
Install Oracle Database 10.2.0.1
-------------------------------------------
Software for Oracle Database can be downloaded from this link
Operating System Prereq.
For linux following version are supported for database version 10.2.0.1 at time of writing this doc
-Redhat-3
-Redhat-4
-SuSe-9
-Aslinux-1
-Aslinux-2
I picked up Red hat ES -3 (Enterprise Server) as operating system.
Packages and Kernel Parameters mentioned below are for database 10.2.0.1 on Red Hat linux Version 3 (Check Installation Documentation if your operating system version differs)
Packages
Following packages with atleast following version should be installed
binutils-2.14
gcc-3.2
libaio-0.3.96
glic-2.3.2-95.47
To check if package/rpm is installed
rpm –qa grep {rpm_name} (From root)
To install package/rpm
rpm –ivh {rpm_name} (From root)
Kernel Parameter
Make sure you add following entry in /etc/sysctl.conf
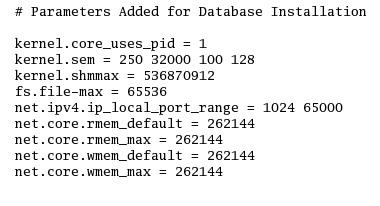
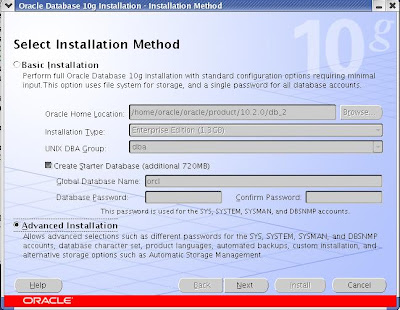 With this screen you get option to do basic database installation where as I opted for Advanced Installation (With Advanced Installation Option you get flexibility on where to keep database and various other options). You can also choose Basic Installation and OUI will ask only basic question and for rest values it will take default (pre configured) values.
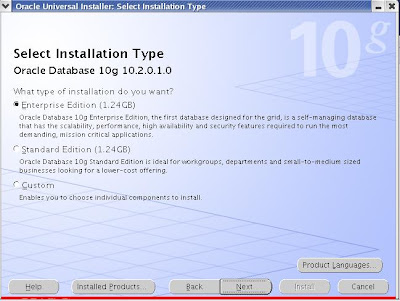
Again you have three options for type of installation for your database (Choose one as per your requirement, if you are not sure which one to pick, leave default i.e. Enterprise Edition)
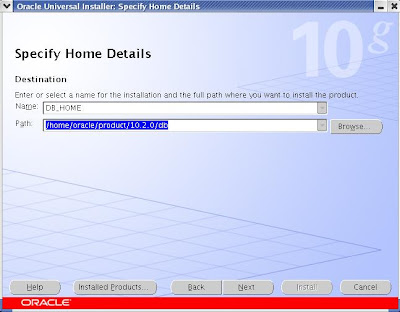 This is important detail which is prompting for Database ORACLE_HOME Name and Destination Path.
ORACLE_HOME is always unique per system which identifies oracle software installed (Oracle Software can be database, application server or various other oracle software)
PATH is directory where your oracle database software will be installed (Please note Oracle Software is not same as Oracle Data files)
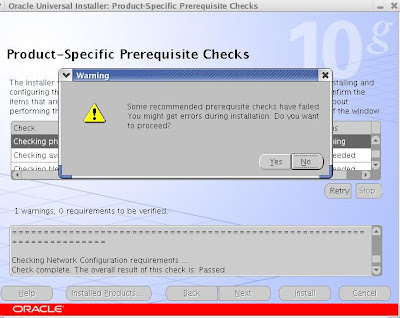
In my case Oracle Database 10.2.X requires minimum 900 MB memory but just had 750 MB allocated to Virtual Machine on which I am installing this database so I got warning related to memory. If you get warning related to memory you can ignore it (Not for Production or UAT deployment)
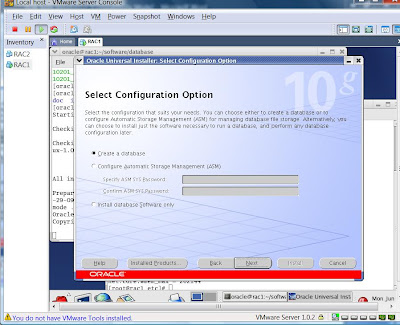
This will complete your database installation for SOA Suite Installation.
If you wish to start/stop oracle database installed above
Set PATH, ORACLE_HOME, ORACLE_SID like
export ORACLE_HOME = /home/oracle/product/10.2.0/db
export ORACLE_SID = SOADEV
export PATH = $PATH:$ORACLE_HOME/bin
(Where ORACLE_HOME and ORACLE_SID we entered above while installing database)
Stopping database services
---------------------------------------
sqlplus “/as sysdba”
SQL> shutdown immediate
lsnrctl stop
Starting database services
---------------------------------------
lsnrctl start
sqlplus “/as sysdba”
SQL> start
For SOA Suite installation stay tuned (coming soon...)
You can also subscribe to email feeds on right menu of this page for updates on this Apps DBA blog.
Fusion Middleware Part I
Fusion Middleware Part I
--In order to install SOA suite version 10.1.3.X you need Database version 10.2.X or higher to hold schema for BPEL, ESB, WSM ....
--This database can exist on same machine (but under different ORACLE_HOME) or can be on different machine where you are planning to install SOA.
--For this installation demo, I installing Database release 10.2.0.1 on same machine under ORACLE_HOME.
--This demo installation is on Redhat Linux ES 3 which is on VMWare.
Install Oracle Database 10.2.0.1
-------------------------------------------
Software for Oracle Database can be downloaded from this link
Operating System Prereq.
For linux following version are supported for database version 10.2.0.1 at time of writing this doc
-Redhat-3
-Redhat-4
-SuSe-9
-Aslinux-1
-Aslinux-2
I picked up Red hat ES -3 (Enterprise Server) as operating system.
Packages and Kernel Parameters mentioned below are for database 10.2.0.1 on Red Hat linux Version 3 (Check Installation Documentation if your operating system version differs)
Packages
Following packages with atleast following version should be installed
binutils-2.14
gcc-3.2
libaio-0.3.96
glic-2.3.2-95.47
To check if package/rpm is installed
rpm –qa grep {rpm_name} (From root)
To install package/rpm
rpm –ivh {rpm_name} (From root)
Kernel Parameter
Make sure you add following entry in /etc/sysctl.conf

After adding these entries execute below command to take these parameters in to effect
sysctl –p /etc/sysctl.conf
Unzip software you downloaded above as
unzip 10201_database_linux32.zip
Starting Database Installation
sysctl –p /etc/sysctl.conf
Unzip software you downloaded above as
unzip 10201_database_linux32.zip
Starting Database Installation
---------------------------------------------
Start Oracle Universal Installer (OUI) by running
./runInstaller (from location where you unzipped database) *Use operating system user like oracle or orainstall (don’t execute runInstaller from root user)
Start Oracle Universal Installer (OUI) by running
./runInstaller (from location where you unzipped database) *Use operating system user like oracle or orainstall (don’t execute runInstaller from root user)
 With this screen you get option to do basic database installation where as I opted for Advanced Installation (With Advanced Installation Option you get flexibility on where to keep database and various other options). You can also choose Basic Installation and OUI will ask only basic question and for rest values it will take default (pre configured) values.
Again you have three options for type of installation for your database (Choose one as per your requirement, if you are not sure which one to pick, leave default i.e. Enterprise Edition)
 This is important detail which is prompting for Database ORACLE_HOME Name and Destination Path.
ORACLE_HOME is always unique per system which identifies oracle software installed (Oracle Software can be database, application server or various other oracle software)
PATH is directory where your oracle database software will be installed (Please note Oracle Software is not same as Oracle Data files)

In my case Oracle Database 10.2.X requires minimum 900 MB memory but just had 750 MB allocated to Virtual Machine on which I am installing this database so I got warning related to memory. If you get warning related to memory you can ignore it (Not for Production or UAT deployment)

In above screen you have option to Create Database, Configure ASM (more coming on ASM with RAC soon ...) or Install database software only.
If you select database software only you can create database later as well (this option will only install oracle database software and will not create any database)
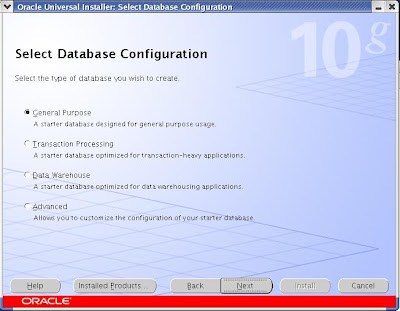
Leave default General Purpose in above screen
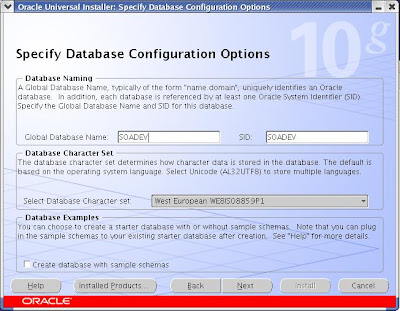
If you have selected “Create a Database” above on this screen you have option to define SID and Global Database name for database which we are going to create with install. (You can leave default “orcl” SID or change like “SOADEV” to uniquely identify this database that it is going to be used with SOA Suite)
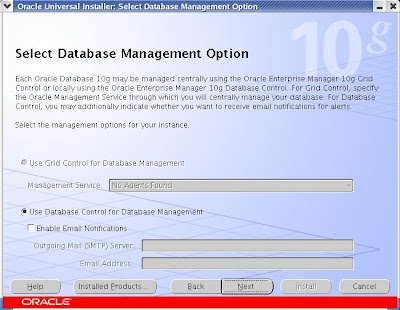
Leave default “Database Control Management” or choose option 1 if you have Grid Control Agents installed on machine on which you are trying to install this database.
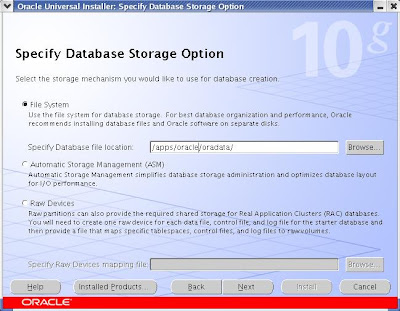
Here you can specify type of storage management for database (SOADEV) which you are going to install. This storage management as seen in image can be File System, ASM or Raw device.
Specify Database file location if you choose File System as storage management. (Database file location can exist under ORACLE_HOME or any other location. * better keep this different from ORACLE_HOME for better management)


Choose password for your various schema (For security reasons, don’t choose same password for all accounts on production instance)

Click on “Install” button to start your installation (Installation may take 30 minutes to 3 hours depending on your machine)


If you wish to unlock non system accounts click on “Password Management” or click “OK” for unlocking them later. (For SOA Suite Installation, you can leave them locked)

execute command root.sh from root user as shown blow


This will complete your database installation for SOA Suite Installation.
If you wish to start/stop oracle database installed above
Set PATH, ORACLE_HOME, ORACLE_SID like
export ORACLE_HOME = /home/oracle/product/10.2.0/db
export ORACLE_SID = SOADEV
export PATH = $PATH:$ORACLE_HOME/bin
(Where ORACLE_HOME and ORACLE_SID we entered above while installing database)
Stopping database services
---------------------------------------
sqlplus “/as sysdba”
SQL> shutdown immediate
lsnrctl stop
Starting database services
---------------------------------------
lsnrctl start
sqlplus “/as sysdba”
SQL> start
For SOA Suite installation stay tuned (coming soon...)
You can also subscribe to email feeds on right menu of this page for updates on this Apps DBA blog.
Subscribe to:
Posts (Atom)