For previous three posts visit
Try installing Orcale RAC on your laptop
RAC Part I - Install Virtual Machine and Linux
RAC Part II - Install Virtual Disk and Network Card
In this post you will
--Clone RAC1 to RAC2 and change IP address of RAc2
--Configure User equivalency for Orale Clusterware installation
Clone RAC1 to RAC2
-------------------------------
- Make sure virtual linux machine is shutdown
-Copy folder rac1 to folder rac2 in c:\Atul\VMWARE (This is on windows laptop/machine)

--In both RAC1 and RAC2 folder open “Red Hat Enterprise Linux 3.vmx” (This is virtual machine configuration file) using notepad or wordpad
--Add following lines (This will avoid locking for shared files and two linux machines RAC1 and RAC2 can start together using shared files votingdisk, crs and asm)
disk.locking = "FALSE"
diskLib.dataCacheMaxSize = "0"
diskLib.dataCacheMaxReadAheadSize = "0"
diskLib.dataCacheMinReadAheadSize = "0"
diskLib.dataCachePageSize = "4096"
diskLib.maxUnsyncedWrites = "0"
--Now on vmx file of RAC2 “Red Hat Enterprise Linux 3.vmx” change following lines from displayName = "RAC1" to displayName = "RAC2"
--On VMWare Server Console, Click on File and Open or “Ctrl + O”

--Click on Browse and select “red hat enterprise linux 3.vmx” from RAC2 directory
--Now you should see two linux machines RAC1 and RAC2 on VMWare Console

Start RAC1 and RAC2 and when you get below warning on RAC2, select create and click OK

Make sure you can start both machine at same time, if you get message like unable to lock files, check you have added following lines in both machines vmx files mentioned above (regarding disk locking)
-------------------------------------------------
Login as ROOT user in RAC2 machine and click System Setting -> Network

Select eth0 and click on Edit

Change Address from 192.168.1.101 to 192.168.1.102
Click on Hardware Device Tab and Click on Probe button

--Repeat steps for second network card eth1 and change its IP from 192.168.0.101 to 192.168.0.102
Make sure you clicked probe on eth1 as well as shown above

Activate both network cards by clicking on Activate as shown below

If you get error message that eth0 has different MAC address expected as shown below; make sure you have clicked on probe on “Bind to Mac Address” on “Hardware Device” mentioned above.

Make sure both network cards are active now, as shown below
Add following entry in /etc/hosts file of both RAC1 and RAC2
####
127.0.0.1 loalhost.localdomain localhost
192.168.1.102 rac2.focusthread.com rac2 rac2-vip.focusthread.com rac2-vip
192.168.0.102 rac2-priv.focusthread.com rac2-priv
192.168.1.101 rac1.focusthread.com rac1 rac1-vip.focusthread.com rac1-vip
192.168.0.101 rac1-priv.focusthread.com rac1-priv
###
Now trying to ping RAC2 machine from RAC1 and RAC1 machine from RAC2
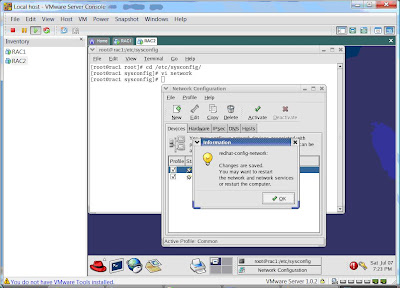
Follow below step on how to change hostname on RAC2 (newly cloned) Linux machine
Open file /etc/sysconfig/network and edit line like : HOSTNAME=XXXXX i.e. from
HOSTNAME rac1.focusthread.com To HOSTNAME rac2.focusthread.com
Configure User Equivalency
-----------------------------------
User equivalency for user oracle is required so that user oracle from RAC1 can communicate to user oracle on RAC2 machine without prompting for password for clusterware to work properly.
--Login as user oracle in machine RAC1
--Make sure sshd daemon is running (pgrep sshd), If not start it from root user like “service start sshd”
--Create RSA and DSA key on each node
-From oracle user go to user home directory by “cd $HOME” or type cd and press enter
-mkdir .ssh (note that there is dot before ssh which means this is hidden directory)
-chmod 700 .ssh
-ssh-keygen –t rsa
-ssh-keygen –t dsa
-mkdir .ssh (note that there is dot before ssh which means this is hidden directory)
-chmod 700 .ssh
-ssh-keygen –t rsa
-ssh-keygen –t dsa
press enter when prompted for file to save the key and passphrase (check screenshot for more information)
“Repeat this on both the nodes i.e. RAC1 and RAC2”
Add keys to authorized key file (authorized_keys)
Add keys to authorized key file (authorized_keys)
------------------------------------------------------------
-cd .ssh
-touch authorized_keys
-ls (You should see authorized_keys, id_dsa, id_dsa.pub, id_rsa, id_rsa.pub. Here pub files are dsa and rsa public key file and id_dsa and id_rsa are private key files)
-ls (You should see authorized_keys, id_dsa, id_dsa.pub, id_rsa, id_rsa.pub. Here pub files are dsa and rsa public key file and id_dsa and id_rsa are private key files)
ssh rac1 cat /home/oracle/.ssh/id_rsa.pub >> authorized_keys
ssh rac1 cat /home/oracle/.ssh/id_dsa.pub >> authorized_keys
ssh rac2 cat /home/oracle/.ssh/id_rsa.pub >> authorized_keys
ssh rac2 cat /home/oracle/.ssh/id_dsa.pub >> authorized_keys
ssh rac1 cat /home/oracle/.ssh/id_dsa.pub >> authorized_keys
ssh rac2 cat /home/oracle/.ssh/id_rsa.pub >> authorized_keys
ssh rac2 cat /home/oracle/.ssh/id_dsa.pub >> authorized_keys
Send authorized_keys from RAC1 to RAC2
scp authorized_keys rac2:/home/oracle/.ssh
From RAC1 machine as user oracle
exec /usr/bin/ssh-agent $SHELL
/usr/bin/ssh-add
exec /usr/bin/ssh-agent $SHELL
/usr/bin/ssh-add
----------------------------
ssh rac1 date
ssh rac2 date
Test this from both nodes RAC1 and RAC2 (You should not be prompted for oracle user password)
For more information on User Equivalency visit chapter 2 (Page 51 to 53) of clusterware and rac installation guide
Coming Next :
Installing clusterware on RAC1 and RAC2
Installing RAC database on RAC1 and RAC2 linux machines using ASM


No comments:
Post a Comment